
Othello for Desktop, Mobile and Web:
an AI and GUI Exercise
(24 June 2017)
Artificial intelligence (AI) is one of those subjects I really wish I'd taken while at university. Philosophical questions about intelligence aside, much of what AI comes down to in practice is techniques for solving problems with computers, which is really what computer science is all about.
A classic AI endeavour is programming computers to play chess. Shannon wrote an article about it already in 1948, and in 1997 the computer Deep Blue defeated humankind represented by world champion Garry Kasparov. A similar but much simpler board game is Othello (sometimes called Reversi), and writing an Othello program has become a popular exercise in AI classes.
I wanted to try my hand at writing an Othello game, but just doing a text-based version seemed lame; it really needs a graphical user interface. I never did much GUI programming (we did some in Java at university, but those weren't real programs), so it would be a good exercise for that too. The question was what platform to target. I use Linux, but most desktop computers run Windows or macOS. Also, most people run programs on smart-phones these days, and isn't the web the future of computing anyway? It would be interesting to learn about all of these platforms. The project scope had suddenly expanded.
This post describes the implementation of a basic Othello game engine in C with native user interfaces for Linux (X11), Windows, Mac, iOS, Android, and the web (asm.js and WebAssembly).
The source code is available in othello.tar.gz, the Windows executable in othello.exe, macOS application in MacOthello.zip, and the web version right here (or here to play as white). The iOS and Android versions are no longer published on the App Store or Google Play, but can be built from source.
Thanks to Nico who provided valuable feedback on drafts of this post!
Update 2019-11-05: Added dark mode support to the iOS port.
Table of Contents
The Othello Engine
This section describes the implementation of a simple Othello engine. It's by no means very strong — other engines can beat it easily — but in practice it seems to win over most human players.
The code is in othello.h and othello.c.
Game Representation: Bitboards
One particularly appealing aspect of Othello (and chess too) is that it is played on an 8-by-8 board, which means the number of squares on the board equals the number of bits in the machine word of a modern 64-bit computer.
Each cell on the board is assigned a corresponding bit position:
| A | B | C | D | E | F | G | H | |
|---|---|---|---|---|---|---|---|---|
| 1 | 0 | 1 | 2 | 3 | 4 | 5 | 6 | 7 |
| 2 | 8 | 9 | 10 | 11 | 12 | 13 | 14 | 15 |
| 3 | 16 | 17 | 18 | 19 | 20 | 21 | 22 | 23 |
| 4 | 24 | 25 | 26 | 27 | 28 | 29 | 30 | 31 |
| 5 | 32 | 33 | 34 | 35 | 36 | 37 | 38 | 39 |
| 6 | 40 | 41 | 42 | 43 | 44 | 45 | 46 | 47 |
| 7 | 48 | 49 | 50 | 51 | 52 | 53 | 54 | 55 |
| 8 | 56 | 57 | 58 | 59 | 60 | 61 | 62 | 63 |
We use two computer words, or bitboards, to keep track of the black and white disks. Each bitboard has the (row * 8 + col)th least significant bit set if and only if there is a disk in that position:
typedef struct {
        uint64_t disks[2];
} othello_t;

typedef enum {
        CELL_BLACK = 0,
        CELL_WHITE = 1,
        CELL_EMPTY = 2
} cell_state_t;

typedef enum {
        PLAYER_BLACK = 0,
        PLAYER_WHITE = 1
} player_t;

cell_state_t othello_cell_state(const othello_t *o, int row, int col)
{
        uint64_t mask = 1ULL << (row * 8 + col);

        assert(row >= 0 && row <= 7);
        assert(col >= 0 && col <= 7);

        if (o->disks[PLAYER_BLACK] & mask) {
                return CELL_BLACK;
        }
        if (o->disks[PLAYER_WHITE] & mask) {
                return CELL_WHITE;
        }
        return CELL_EMPTY;
}

void othello_set_cell_state(othello_t *o, int row, int col, cell_state_t s)
{
        uint64_t mask = 1ULL << (row * 8 + col);

        assert(row >= 0 && row <= 7);
        assert(col >= 0 && col <= 7);

        o->disks[PLAYER_BLACK] &= ~mask;
        o->disks[PLAYER_WHITE] &= ~mask;

        if (s == CELL_BLACK) {
                o->disks[PLAYER_BLACK] |= mask;
        } else if (s == CELL_WHITE) {
                o->disks[PLAYER_WHITE] |= mask;
        }
}
To set up a new game, we put disks in the starting position: black disks on D5 and E4, white disks on D4 and E5.
void othello_init(othello_t *o)
{
        o->disks[PLAYER_BLACK] = 0;
        o->disks[PLAYER_WHITE] = 0;

        othello_set_cell_state(o, 3, 4, CELL_BLACK);
        othello_set_cell_state(o, 4, 3, CELL_BLACK);
        othello_set_cell_state(o, 3, 3, CELL_WHITE);
        othello_set_cell_state(o, 4, 4, CELL_WHITE);
}
Counting the number of disks in a bitboard (the population count) is useful, for example to compute a player's score. Some processors provide special instructions for this (POPCNT on x86), and GCC provides a built-in function to use such an instruction if available. For non-GCC we use a for-loop (see Hacker's Delight, Chapter 5 for many ways of doing this).
static int popcount(uint64_t x)
{
#ifdef __GNUC__
        return __builtin_popcountll(x);
#else
        int n = 0;

        while (x) {
                x &= x - 1;
                n++;
        }

        return n;
#endif
}

int othello_score(const othello_t *o, player_t p)
{
        return popcount(o->disks[p]);
}
Storing the disks in bitboards is memory efficient, but it's nothing more than a cute trick unless we can operate on them efficiently. It turns out that we can.
Using bitwise operators, we can perform set operations on the disks. For example, (black_disks | white_disks) computes the union of both sets of disks, and ~(black_disks | white_disks) gets the complement, that is the set of empty squares on the board.
This is exciting because we are using a few very fast instructions to operate on many disks at the same time.
But it gets better! Using bitwise shift operations, we can move disks around. Looking at the bits with the least significant bit at the lower right, see what happens when we do bitboard >> 1:
| bitboard | |||||||
|---|---|---|---|---|---|---|---|
| 63 | 62 | 61 | 60 | 59 | 58 | 57 | 56 |
| 55 | 54 | 53 | 52 | 51 | 50 | 49 | 48 |
| 47 | 46 | 45 | 44 | 43 | 42 | 41 | 40 |
| 39 | 38 | 37 | 36 | 35 | 34 | 33 | 32 |
| 31 | 30 | 29 | 28 | 27 | 26 | 25 | 24 |
| 23 | 22 | 21 | 20 | 19 | 18 | 17 | 16 |
| 15 | 14 | 13 | 12 | 11 | 10 | 9 | 8 |
| 7 | 6 | 5 | 4 | 3 | 2 | 1 | 0 |
| bitboard >> 1 | |||||||
|---|---|---|---|---|---|---|---|
| 63 | 62 | 61 | 60 | 59 | 58 | 57 | |
| 56 | 55 | 54 | 53 | 52 | 51 | 50 | 49 |
| 48 | 47 | 46 | 45 | 44 | 43 | 42 | 41 |
| 40 | 39 | 38 | 37 | 36 | 35 | 34 | 33 |
| 32 | 31 | 30 | 29 | 28 | 27 | 26 | 25 |
| 24 | 23 | 22 | 21 | 20 | 19 | 18 | 17 |
| 16 | 15 | 14 | 13 | 12 | 11 | 10 | 9 |
| 8 | 7 | 6 | 5 | 4 | 3 | 2 | 1 |
Each bit has moved to the right, except the bits in the right-most column which wrapped around, or in the case of zero was pushed off the board. To exclude the bits that wrap around, we use a bitwise and to mask them off (0x7F in binary is 01111111):
| (bitboard >> 1) & 0x7F7F7F7F7F7F7F7FULL | |||||||
|---|---|---|---|---|---|---|---|
| 63 | 62 | 61 | 60 | 59 | 58 | 57 | |
| 55 | 54 | 53 | 52 | 51 | 50 | 49 | |
| 47 | 46 | 45 | 44 | 43 | 42 | 41 | |
| 39 | 38 | 37 | 36 | 35 | 34 | 33 | |
| 31 | 30 | 29 | 28 | 27 | 26 | 25 | |
| 23 | 22 | 21 | 20 | 19 | 18 | 17 | |
| 15 | 14 | 13 | 12 | 11 | 10 | 9 | |
| 7 | 6 | 5 | 4 | 3 | 2 | 1 | |
Since the bit in each position represents a disk on the board, we now have a way of moving all disks one step to the right with only a shift and an and.
The same technique can be used for all eight directions. To move the disks left, left-shift one step and mask off the rightmost column. To move up or down, shift left or right 8 bits respectively, no masking necessary. To move down-and-left, shift right 7 bits, mask off the rightmost column and top row. And so on.
The function below shifts disks one step in a certain direction:
#define NUM_DIRS 8

/* Shift disks in direction dir. */
static uint64_t shift(uint64_t disks, int dir)
{
        /* Note: the directions refer to how we shift the bits, not the
           positions on the board (where the least significant bit is
           the top-left corner). */

        static const uint64_t MASKS[] = {
                0x7F7F7F7F7F7F7F7FULL, /* Right. */
                0x007F7F7F7F7F7F7FULL, /* Down-right. */
                0xFFFFFFFFFFFFFFFFULL, /* Down. */
                0x00FEFEFEFEFEFEFEULL, /* Down-left. */
                0xFEFEFEFEFEFEFEFEULL, /* Left. */
                0xFEFEFEFEFEFEFE00ULL, /* Up-left. */
                0xFFFFFFFFFFFFFFFFULL, /* Up. */
                0x7F7F7F7F7F7F7F00ULL  /* Up-right. */
        };
        static const uint64_t LSHIFTS[] = {
                0, /* Right. */
                0, /* Down-right. */
                0, /* Down. */
                0, /* Down-left. */
                1, /* Left. */
                9, /* Up-left. */
                8, /* Up. */
                7  /* Up-right. */
        };
        static const uint64_t RSHIFTS[] = {
                1, /* Right. */
                9, /* Down-right. */
                8, /* Down. */
                7, /* Down-left. */
                0, /* Left. */
                0, /* Up-left. */
                0, /* Up. */
                0  /* Up-right. */
        };

        assert(dir >= 0 && dir < NUM_DIRS);

        if (dir < NUM_DIRS / 2) {
                assert(LSHIFTS[dir] == 0 && "Shifting right.");
                return (disks >> RSHIFTS[dir]) & MASKS[dir];
        } else {
                assert(RSHIFTS[dir] == 0 && "Shifting left.");
                return (disks << LSHIFTS[dir]) & MASKS[dir];
        }
}
(Why shift all bits and mask afterwards instead of masking first, thereby only shifting the bits we want? It's because later we will do shift(x, dir) & opp_disks repeatedly, and this way masks[dir] & opp_disks becomes a common subexpression that only needs to be computed once.)
Move Generation and Resolution
Computing the set of legal moves for a player, a process known as move generation, is the first step towards computing the best move to make. The operations explained above allow us to do it efficiently.
A legal Othello move is one which captures one or more of the opponent's disks between the new disk and one of the player's current disks in a straight line — horizontally, vertically or diagonally.
For example, on the board below the legal moves for black are C3, C4 and C6 (marked with X):
| A | B | C | D | E | F | G | H | |
|---|---|---|---|---|---|---|---|---|
| 1 | ||||||||
| 2 | ||||||||
| 3 | X | |||||||
| 4 | X | |||||||
| 5 | ||||||||
| 6 | X | |||||||
| 7 | ||||||||
| 8 |
Consider the black disk at F6 above. Moving up-and-left, it has a white neighbour disk (E5), and then another one (D4), and then an empty square at C3 which means that's a valid move.
This reasoning can be turned into an algorithm. For each of our disks, we follow opponent neighbour disks in some direction until we hit an empty square, which is then a legal move. Since the board is 8 squares wide, that empty square can be a maximum of 7 squares away from the original disk. Repeating this for each direction will find all legal moves.
The bitboard representation allows us to work with all the disks simultaneously. For example, to get the opponent disks immediately to the right of ours, we do x = shift(my_disks, 0) & opp_disks, that is we take the intersection of our disks shifted one step right and the set of opponent disks. To add the opponent disks adjacent to those, we do it again: x |= shift(x, 0) & opp_disks. After seven shifts we intersect with the set of empty cells to get the of valid moves in that direction. The function below implements this technique to generate the moves:
static uint64_t generate_moves(uint64_t my_disks, uint64_t opp_disks)
{
        int dir;
        uint64_t x;
        uint64_t empty_cells = ~(my_disks | opp_disks);
        uint64_t legal_moves = 0;

        assert((my_disks & opp_disks) == 0 && "Disk sets should be disjoint.");

        for (dir = 0; dir < NUM_DIRS; dir++) {
                /* Get opponent disks adjacent to my disks in direction dir. */
                x = shift(my_disks, dir) & opp_disks;

                /* Add opponent disks adjacent to those, and so on. */
                x |= shift(x, dir) & opp_disks;
                x |= shift(x, dir) & opp_disks;
                x |= shift(x, dir) & opp_disks;
                x |= shift(x, dir) & opp_disks;
                x |= shift(x, dir) & opp_disks;

                /* Empty cells adjacent to those are valid moves. */
                legal_moves |= shift(x, dir) & empty_cells;
        }

        return legal_moves;
}
(This method of "following" connected disks is a flood fill algorithm, and because we do it seven times, it is sometimes referred to as Dumb7Fill.)
(While the bitwise operations are very efficient, having to repeat the whole process eight times might seem a little annoying. But note that except for the update of legal_moves, each iteration of the loop body performs exactly the same operations over independent sets of data — it is perfect for SIMD machine instructions. Compiled with GCC 6 on my Haswell machine, the function can execute about 23 million times per second, but with AVX2 instructions enabled it runs 85 million times per second. Pretty fast!)
We use generate_moves to check whether a player has legal moves or whether a certain proposed move is valid in the code below. (Since p is 1 or 0, p ^ 1, gets us the other player. !p would also work, but the XOR version tends to yield smaller and faster code.)
bool othello_has_valid_move(const othello_t *o, player_t p)
{
        return generate_moves(o->disks[p], o->disks[p ^ 1]) != 0;
}

bool othello_is_valid_move(const othello_t *o, player_t p, int row, int col)
{
        uint64_t mask = 1ULL << (row * 8 + col);

        assert(row >= 0 && row <= 7);
        assert(col >= 0 && col <= 7);

        return (generate_moves(o->disks[p], o->disks[p ^ 1]) & mask) != 0;
}
To update the board after a move has been made, a process called move resolution, we add the new disk to the board and flip the opponent disks that were captured. To find the captured disks, we use a similar method to the one above. For each direction, we follow opponent disks adjacent to the new disk, and if we end up at one of our own disks, the opponent disks we followed are captured:
static void resolve_move(uint64_t *my_disks, uint64_t *opp_disks, int board_idx)
{
        int dir;
        uint64_t x, bounding_disk;
        uint64_t new_disk = 1ULL << board_idx;
        uint64_t captured_disks = 0;

        assert(board_idx < 64 && "Move must be within the board.");
        assert((*my_disks & *opp_disks) == 0 && "Disk sets must be disjoint.");
        assert(!((*my_disks | *opp_disks) & new_disk) && "Target not empty!");

        *my_disks |= new_disk;

        for (dir = 0; dir < NUM_DIRS; dir++) {
                /* Find opponent disk adjacent to the new disk. */
                x = shift(new_disk, dir) & *opp_disks;

                /* Add any adjacent opponent disk to that one, and so on. */
                x |= shift(x, dir) & *opp_disks;
                x |= shift(x, dir) & *opp_disks;
                x |= shift(x, dir) & *opp_disks;
                x |= shift(x, dir) & *opp_disks;
                x |= shift(x, dir) & *opp_disks;

                /* Determine whether the disks were captured. */
                bounding_disk = shift(x, dir) & *my_disks;
                captured_disks |= (bounding_disk ? x : 0);
        }

        assert(captured_disks && "A valid move must capture disks.");

        *my_disks ^= captured_disks;
        *opp_disks ^= captured_disks;

        assert(!(*my_disks & *opp_disks) && "The sets must still be disjoint.");
}

void othello_make_move(othello_t *o, player_t p, int row, int col)
{
        assert(othello_is_valid_move(o, p, row, col));

        resolve_move(&o->disks[p], &o->disks[p ^ 1], row * 8 + col);
}
Position Evaluation
In order to find a good move, the program needs to be able to differentiate between good and bad game positions. Obviously a won game is good and a lost one is bad, but since the program cannot look ahead until the end of the game most of the time, it needs to evaluate intermediate positions as well.
The evaluation function is a heuristic that estimates how good the position is for the current player: the better the position, the larger the returned value. If the position is better for the opponent, the value is negative.
Because the objective of Othello is to have the most disks in the end, a naive way of evaluating positions would be to simply compare the number of disks for both players. This is a bad idea since disks can flip and many disks for one player could become many disks for the opponent after the next move.
Another idea is to assign weights to the different squares on the board and compute a score based on disks in those squares. For example, corner disks are valuable because they cannot be flipped, and the squares next to the corners are dangerous because they potentially give the opponent access to the corner. Coming up with good weights for the whole board is tricky, though.
My evaluation function is based on the mobility-based approach from Gunnar Andersson's homepage. It computes a score using three features of the position: the number of available moves, frontier disks (disks adjacent to empty cells), and captured corners:
static void frontier_disks(uint64_t my_disks, uint64_t opp_disks,
                           uint64_t *my_frontier, uint64_t *opp_frontier)
{
        uint64_t empty_cells = ~(my_disks | opp_disks);
        uint64_t x;
        int dir;

        *my_frontier = 0;
        *opp_frontier = 0;

        for (dir = 0; dir < NUM_DIRS; dir++) {
                /* Check cells adjacent to empty cells. */
                x = shift(empty_cells, dir);
                *my_frontier |= x & my_disks;
                *opp_frontier |= x & opp_disks;
        }
}

#define WIN_BONUS (1 << 20)

static int eval(uint64_t my_disks, uint64_t opp_disks,
                uint64_t my_moves, uint64_t opp_moves)
{
        static const uint64_t CORNER_MASK = 0x8100000000000081ULL;

        int my_disk_count, opp_disk_count;
        uint64_t my_corners, opp_corners;
        uint64_t my_frontier, opp_frontier;
        int score = 0;

        if (!my_moves && !opp_moves) {
                /* Terminal state. */
                my_disk_count = popcount(my_disks);
                opp_disk_count = popcount(opp_disks);
                return (my_disk_count - opp_disk_count) * WIN_BONUS;
        }

        my_corners = my_disks & CORNER_MASK;
        opp_corners = opp_disks & CORNER_MASK;

        frontier_disks(my_disks, opp_disks, &my_frontier, &opp_frontier);

        /* Optimize for corners, mobility and few frontier disks. */
        score += (popcount(my_corners) - popcount(opp_corners)) * 16;
        score += (popcount(my_moves) - popcount(opp_moves)) * 2;
        score += (popcount(my_frontier) - popcount(opp_frontier)) * -1;

        assert(abs(score) < WIN_BONUS);

        return score;
}
Note that scores in the end state are computed separately; an actual win is better than even the most promising non-final position.
The evaluation function is very much a "careful what you wish for" kind of thing. If you give a large bonus for capturing corners, the program will try to capture corners at the expense of the other criteria. A program with a sufficiently strong evaluation function will beat an opponent with a weaker one, even if the opponent is considering moves further ahead in the game; optimizing for the wrong metric is no use in the end, no matter how well one does it.
Computing the Best Move
Now that we know what legal moves are available and have a heuristic for scoring different positions, how do we compute the best move?
One optimistic approach would be to consider each move and pick the one that could lead to the best future position. The only problem is that our opponent is likely to do their best in preventing us from reaching it.
A more carefully calculated approach is to assume our opponent is doing their best to defeat us. For each move we could make, we assume that the opponent would play to minimize the score for us, and so we pick the move which yields the largest, maximum, of those scores — the minimax value.
How do we know what move our opponent would make to minimize the score? We use the same idea: the opponent considers how we would follow their move, and picks the minimum of those scores. This gives us a recursive algorithm:
function minimax(position, player):
  if position is terminal or max depth reached:
    return eval(position)

  if player == black:
    max_score = -infinity
    for each move:
      new_position = resolve(position, move)
      score = minimax(new_position, white)
      if score > max_score:
        max_score = score
        best_move = move
    return max_score

  if player == white:
    min_score = infinity
    for each move:
      new_position = resolve(position, move)
      score = minimax(new_position, black)
      if score < min_score:
        min_score = score
        best_move = move
    return min_score
Alpha-beta pruning is an important optimization of this algorithm. The idea is to keep track of the best guaranteed result for black (alpha) and for white (beta) in the search so far, that is alpha <= score <= beta. As long as those bounds can be tightened, in other words while alpha < beta, the search continues, but scores outside the range are not worth considering since they cannot impact the result. This significantly reduces the number of moves that need to be considered:
function minimax(position, player, alpha, beta):
  if position is terminal or max depth reached:
    return eval(position)

  if player == black:
    max_score = -infinity
    for each move:
      new_position = resolve(position, move)
      score = minimax(new_position, white, alpha, beta)
      if score > max_score:
        max_score = score
        best_move = move
        alpha = max(alpha, score)
      if alpha >= beta:
        break
    return max_score

  if player == white:
    min_score = infinity
    for each move:
      new_position = resolve(position, move)
      score = minimax(new_position, black, alpha, beta)
      if score < min_score:
        min_score = score
        best_move = move
        beta = min(beta, score)
      if alpha >= beta:
        break
    return min_score
Patrick Winston explains minimax with alpha-beta pruning in his lecture from the MIT AI course (minimax starts at 16:30).
As a convenience when implementing this, to avoid having separate cases for black and white in the minimax function, we will use a formulation of the algorithm called negamax. Instead of letting the white player search for a minimum score from the position after our move, we reverse the position (black disks become white and vice versa) and search for a maximum score from there. We then negate the result of that (high scores for the opponent are low scores for us). This computes the exact same value as before, but with the same code for both players:
function negamax(position, alpha, beta):
  if position is terminal or max depth reached:
    return eval(position)

  max_score = -infinity
  for each move:
    new_position = resolve(position, move)
    score = -negamax(reverse(new_position), -beta, -alpha)
    if score > max_score:
      max_score = score
      best_move = move
      alpha = max(alpha, score)
    if alpha >= beta:
      break
  return max_score
This is what the implementation looks like:
static int negamax(uint64_t my_disks, uint64_t opp_disks, int max_depth,
                   int alpha, int beta, int *best_move, int *eval_count)
{
        uint64_t my_moves, opp_moves;
        uint64_t my_new_disks, opp_new_disks;
        int i, s, best;

        /* Generate moves. */
        my_moves = generate_moves(my_disks, opp_disks);
        opp_moves = generate_moves(opp_disks, my_disks);

        if (!my_moves && opp_moves) {
                /* Null move. */
                return -negamax(opp_disks, my_disks, max_depth, -beta, -alpha,
                                best_move, eval_count);
        }

        if (max_depth == 0 || (!my_moves && !opp_moves)) {
                /* Maximum depth or terminal state reached. */
                ++*eval_count;
                return eval(my_disks, opp_disks, my_moves, opp_moves);
        }

        /* Find the best move. */
        assert(alpha < beta);
        best = -INT_MAX;
        for (i = 0; i < 64; i++) {
                if (!(my_moves & (1ULL << i))) {
                        continue;
                }
                my_new_disks = my_disks;
                opp_new_disks = opp_disks;
                resolve_move(&my_new_disks, &opp_new_disks, i);

                s = -negamax(opp_new_disks, my_new_disks,
                             max_depth - 1, -beta, -alpha, NULL,
                             eval_count);

                if (s > best) {
                        best = s;
                        if (best_move) {
                                *best_move = i;
                        }
                        alpha = s > alpha ? s : alpha;

                        if (alpha >= beta) {
                                break;
                        }
                }
        }

        return best;
}
How deep should we search? That depends on how long we're willing to wait and where we are in the game: towards the end of the game we can search deeper because there are fewer possible moves.
The technique we will use is called iterative deepening. The idea is to keep searching deeper until the best move is a win or loss, or we run out of time. However, since I would like the program to play identically across all platforms and devices, instead of a time budget we will use a budget for number of evaluations:
static int iterative_negamax(uint64_t my_disks, uint64_t opp_disks,
                             int start_depth, int eval_budget)
{
        int depth, best_move, eval_count, s;

        assert(start_depth > 0 && "At least one move must be explored.");

        eval_count = 0;
        best_move = -1;
        for (depth = start_depth; eval_count < eval_budget; depth++) {
                s = negamax(my_disks, opp_disks, depth, -INT_MAX, INT_MAX,
                            &best_move, &eval_count);
                if (s >= WIN_BONUS || -s >= WIN_BONUS) {
                        break;
                }
        }

        assert(best_move != -1 && "No move found?");

        return best_move;
}

void othello_compute_move(const othello_t *o, player_t p, int *row, int *col)
{
        int move_idx;

        static const int START_DEPTH = 8;
        static const int EVAL_BUDGET = 500000;

        assert(othello_has_valid_move(o, p));

        move_idx = iterative_negamax(o->disks[p], o->disks[p ^ 1],
                                     START_DEPTH, EVAL_BUDGET);

        *row = move_idx / 8;
        *col = move_idx % 8;
}
Sebastian Lague has made an extremely good video about these techniques and more in the context of chess programming.
User Interfaces
X11
The X Window System, X11 (11 being the latest major revision, released in 1987), or just X, is like an ancient beast lurking at the bottom of the lake of Unix, old and ever-present. First developed at MIT in the eighties, it's still at the centre of desktop environments today. It is slated to be replaced by Wayland, but that hasn't happened yet.
While virtually all graphical Unix applications use it, almost none interact with X directly. Instead, a graphical toolkit library such as GTK+ or Qt is normally used. Besides providing a more modern programming interface, such toolkits provide routines for using application widgets — buttons, text boxes, menus, etc. Even really old X programs used toolkits such as Xaw or Motif, because X itself only deals with primitives such as windows, lines, circles, etc.
The Othello game doesn't really need any widgets though, and I would like to learn about X at a low level, so we will use it directly through its client library, Xlib. (One could go even deeper: since X is a network protocol, we could send packets to the server directly, no client library needed. However, that might be one step too far even for this post.)
I learned about X from the classic manuals published by O'Reilly: Xlib Programming Manual (Vol 1) and Xlib Reference Manual (Vol 2) edited by Adrian Nye. (According to legend, the X manuals were what got O'Reilly started.) These are now out of print, but used copies are easy to come by. X.Org has more documentation. See also Jasper St. Pierre's Xplain series.
The code is available in x11_othello.c.
Our Othello program will be organized more or less according to the Model-view-controller pattern. We model the game using the structures and routines defined in the previous section, and an enum to keep track of whose turn it is:
static othello_t board;
static enum { BLACKS_MOVE, WHITES_MOVE, GAME_OVER } state;
The view is what the user sees, the visualization of the game. It is drawn as a grid with disks in the appropriate cells, etc. We keep track of the grid's size and position in the window, as well as the currently selected cell:
static struct {
        int x, y;      /* Position of the grid relative to window origin. */
        int size;      /* Size (width and height are equal) of the grid. */
        int cell_size; /* Size of a grid cell, not including its border. */
        int sel_row;   /* Currently selected row, or -1 if none. */
        int sel_col;   /* Currently selected column. */
} grid;
To draw our grid and interact with X in general, we need a few more things:
static Display *display;
static Window win;
static GC black_gc;
static GC white_gc;
static GC board_gc;     /* For the board background. */
static GC highlight_gc; /* For selected grid cells. */
static XFontStruct *font;
static Atom wm_delete_window;
X11 is a network protocol, the idea being that an application does not necessarily have to be running on the same computer through which a user interacts with it. The application (X client) could be running on one machine, perhaps a beefy computer in a data centre, while the user interacts with it through the keyboard, mouse and monitor of a computer (X server) in their office. The Display object represents the connection to the X server, which these days is normally on the same machine as the application itself.
The Window object represents the window our program will use to interact with the user. The GC objects are graphics contexts. They determine the style (colour, stroke width, etc) when drawing lines and such. The XFontStruct is what we'll use for text, and the Atom refers to a message we need to handle.
Initialization
We need a fair amount of boilerplate code to initialize our application. (This is what we get for using a low-level library.) First, we attempt to connect to the server with XOpenDisplay:
#define CELL_GAP 1       /* Cell gap in pixels. */
#define FONT_NAME "9x15" /* Font for labels and status. */
#define MIN_SIZE 300     /* Minimum window size. */
#define INIT_SIZE 450    /* Initial window size. */

static void init(int argc, char **argv)
{
        XSizeHints *size_hints;
        XWMHints *wm_hints;
        XClassHint *class_hint;
        unsigned long black_color, white_color, grey_color;
        unsigned long board_color, hl_color;
        char *window_name = "Othello";
        XTextProperty window_name_prop;

        /* Connect to the display. */
        if (!(display = XOpenDisplay(NULL))) {
                err("cannot connect to X server %s", XDisplayName(NULL));
        }
The NULL argument specifies that we want the default screen (specified by the DISPLAY envionment variable, usually as :0, meaning the first display on the local machine).
Once connected, we allocate some colours. XAllocColor asks the server to add a specific colour (or as close an approximation as possible) to its colormap, or palette, and returns an index into this map. We wrap the call in a convenience function:
static unsigned long alloc_color(uint8_t red, uint8_t green, uint8_t blue)
{
        XColor color;
        Colormap map;

        map = DefaultColormap(display, DefaultScreen(display));
        color.red   = red   * 256;
        color.green = green * 256;
        color.blue  = blue  * 256;

        if (!XAllocColor(display, map, &color)) {
                err("XAllocColor failed");
        }

        return color.pixel;
}
and use that to allocate the colours we'll need for drawing (back in init):
        /* Allocate colours. */
        black_color = alloc_color(0x00, 0x00, 0x00);
        white_color = alloc_color(0xFF, 0xFF, 0xFF);
        grey_color  = alloc_color(0xC0, 0xC0, 0xC0);
        board_color = alloc_color(0x00, 0x80, 0x00);
        hl_color    = alloc_color(0x00, 0xAA, 0x00);
Then we create the window with a call to XCreateSimpleWindow:
        /* Create the window. */
        win = XCreateSimpleWindow(display,
                                  RootWindow(display, DefaultScreen(display)),
                                  0, 0, INIT_SIZE, INIT_SIZE, CELL_GAP,
                                  black_color, grey_color);
The parameters specify the display (X server), and that we want our window to be the child of the root window of the default screen on that server. (Historically there could be multiple X screens if multiple monitors were attached to one machine; these days, there is usually just one screen that covers all monitors.) The other parameters specify the initial position (0,0), size, border width (mostly ignored these days I think), foreground and background colour.
Note that the new window is not shown yet. We will reveal it later, after everything has been initialized.
Next, we pass more information about the window to the window manager. This includes the title of the window (in the form of an XTextProperty, created with XStringListToTextProperty), the minimum size, initial state (minimized or normal), whether the window takes input, the name of the application, and so on. For both size_hints and wm_hints, we use the flags field to indicate which parts of the structure we're filling in.
In wm_hints we also set the icon for the application. It is loaded from an XPM file, which is #included directly into our source, using XpmCreatePixmapFromData. That function isn't strictly part of Xlib, but a separate XPM library. That is normally always available on systems that have X, though.
        /* Prepare window name property. */
        if (!XStringListToTextProperty(&window_name, 1, &window_name_prop)) {
                err("XStringListToTextProperty failed");
        }

        /* Prepare size hints. */
        if (!(size_hints = XAllocSizeHints())) {
                err("XAllocSizeHints() failed");
        }
        size_hints->flags = PMinSize;
        size_hints->min_width = MIN_SIZE;
        size_hints->min_height = MIN_SIZE;

        /* Prepare window manager hints. */
        if (!(wm_hints = XAllocWMHints())) {
                err("XAllocWMHints() failed");
        }
        wm_hints->initial_state = NormalState;
        wm_hints->input = True;
        wm_hints->flags = StateHint | InputHint;
        if (XpmCreatePixmapFromData(display, win, othello_icon,
                                    &wm_hints->icon_pixmap,
                                    &wm_hints->icon_mask, NULL) == XpmSuccess) {
                wm_hints->flags |= IconPixmapHint | IconMaskHint;
        }

        /* Prepare class hint. */
        if (!(class_hint = XAllocClassHint())) {
                err("XAllocClassHint() failed");
        }
        class_hint->res_name = argv[0];
        class_hint->res_class = window_name;

        /* Set name property, size, wm and class hints for the window. */
        XSetWMProperties(display, win, &window_name_prop, &window_name_prop,
                         argv, argc, size_hints, wm_hints, class_hint);
        XFree(window_name_prop.value);
        XFree(size_hints);
        XFree(wm_hints);
        XFree(class_hint);
We tell the X server what type of events we want to be notified of, by passing an event mask to XSelectInput. We also tell the window manager that we would like to use the WM_DELETE_WINDOW protocol, which means we want to be notified if the user clicks the close button on the window.
        /* Register for events. */
        XSelectInput(display, win, ExposureMask | KeyPressMask |
                        ButtonPressMask | StructureNotifyMask |
                        PointerMotionMask | PointerMotionHintMask);

        wm_delete_window = XInternAtom(display, "WM_DELETE_WINDOW", False);
        if (!XSetWMProtocols(display, win, &wm_delete_window, 1)) {
                err("XSetWMProtocols failed");
        }
As the final steps of initialization, we load the font and create the graphics contexts that we'll need for drawing:
        /* Load the font. */
        if (!(font = XLoadQueryFont(display, FONT_NAME))) {
                err("cannot open %s font", FONT_NAME);
        }

        /* Set up GCs. */
        black_gc = XCreateGC(display, win, 0, NULL);
        XSetForeground(display, black_gc, black_color);
        XSetFont(display, black_gc, font->fid);

        white_gc = XCreateGC(display, win, 0, NULL);
        XSetForeground(display, white_gc, white_color);

        board_gc = XCreateGC(display, win, 0, NULL);
        XSetForeground(display, board_gc, board_color);

        highlight_gc = XCreateGC(display, win, 0, NULL);
        XSetForeground(display, highlight_gc, hl_color);
And now we're ready to request the window to be shown, or mapped in X parlance:
        /* Show the window. */
        XMapWindow(display, win);
}
Drawing
Before drawing the grid, we need to know exactly where to draw it. We divide the height or width (whichever is smallest) of the window to fit a 10-by-10 grid of equal-size quadratic cells with CELL_GAP pixels in between them. Then we position the grid in the centre of the window:
/* Compute the grid's size and position in the window. */
static void compute_grid_position(int win_width, int win_height)
{
        /* The grid is a 10x10 grid. The 8x8 centre is the Othello
           board, the top row and left column are used for labels, and the
           bottom row for status text. */

        grid.cell_size = (min(win_width, win_height) - 9 * CELL_GAP) / 10;
        grid.size = grid.cell_size * 10 + 9 * CELL_GAP;
        grid.x = win_width / 2 - grid.size / 2;
        grid.y = win_height / 2 - grid.size / 2;
}
Knowing the size and position of the grid is also necessary for hit testing, checking whether a position (the mouse position in our case) intersects with an Othello cell:
/* Check whether the position is over an Othello cell. */
static bool grid_hit_test(int x, int y, int *row, int *col)
{
        *row = (y - grid.y) / (grid.cell_size + CELL_GAP) - 1;
        *col = (x - grid.x) / (grid.cell_size + CELL_GAP) - 1;

        if (*row >= 0 && *row < 8 && *col >= 0 && *col < 8) {
                return true;
        }

        return false;
}
The code below is used to draw an Othello cell. First, the cell background is drawn using XFillRectangle. A different graphics context is used for different colour depending on whether the cell is currently selected. If there is a disk in the cell, XFillArc is used to draw it as a filled circle.
/* Draw an Othello cell and its contents. */
static void draw_othello_cell(int row, int col)
{
        int x, y;
        bool highlight;
        cell_state_t cs;

        x = grid.x + (col + 1) * (grid.cell_size + CELL_GAP);
        y = grid.y + (row + 1) * (grid.cell_size + CELL_GAP);

        highlight = (row == grid.sel_row && col == grid.sel_col &&
                     state == BLACKS_MOVE);

        /* Draw the cell background. */
        XFillRectangle(display, win, highlight ? highlight_gc : board_gc,
                       x, y, grid.cell_size, grid.cell_size);

        if ((cs = othello_cell_state(&board, row, col)) != CELL_EMPTY) {
                /* Draw the disk. */
                XFillArc(display, win, cs == CELL_BLACK ? black_gc : white_gc,
                         x, y, grid.cell_size, grid.cell_size, 0, 360 * 64);
        }
}
To draw row and column labels around the board, and status text below it, we use a helper function for drawing text centered at a specific position:
/* Draw string s of length len centered at (x,y). */
static void draw_string(const char *s, int len, int x, int y)
{
        int width, height;

        width = XTextWidth(font, s, len);
        height = font->ascent + font->descent;

        XDrawString(display, win, black_gc,
                    x - width / 2, y + height / 2,
                    s, len);
}
Finally, the function below is used to draw the whole grid:
/* Draw the grid and its contents. */
static void draw_grid(void)
{
        int row, col, x, y, bs, ws;
        char status[128];

        XClearWindow(display, win);

        /* Draw a background square around the 8x8 centre cells. */
        XFillRectangle(display, win, black_gc,
                       grid.x + grid.cell_size,
                       grid.y + grid.cell_size,
                       8 * grid.cell_size + 9 * CELL_GAP,
                       8 * grid.cell_size + 9 * CELL_GAP);

        /* Draw labels. */
        for (row = 0; row < 8; row++) {
                x = grid.x + grid.cell_size / 2;
                y = grid.y + (row + 1) * (grid.cell_size + CELL_GAP) +
                        grid.cell_size / 2;
                draw_string(&"12345678"[row], 1, x, y);
        }
        for (col = 0; col < 8; col++) {
                x = grid.x + (col + 1) * (grid.cell_size + CELL_GAP) +
                        grid.cell_size / 2;
                y = grid.y + grid.cell_size / 2;
                draw_string(&"ABCDEFGH"[col], 1, x, y);
        }

        /* Draw status text. */
        switch (state) {
        case BLACKS_MOVE:
                sprintf(status, "Human's move.");
                break;
        case WHITES_MOVE:
                sprintf(status, "Computer's move..");
                break;
        case GAME_OVER:
                bs = othello_score(&board, PLAYER_BLACK);
                ws = othello_score(&board, PLAYER_WHITE);
                if (bs > ws) {
                        sprintf(status, "Human wins %d-%d!", bs, ws);
                } else if (ws > bs) {
                        sprintf(status, "Computer wins %d-%d!", ws, bs);
                } else {
                        sprintf(status, "Draw!");
                }
        }
        draw_string(status, strlen(status), grid.x + grid.size / 2,
                    grid.y + grid.size - grid.cell_size / 2);

        /* Draw cells. */
        for (row = 0; row < 8; row++) {
                for (col = 0; col < 8; col++) {
                        draw_othello_cell(row, col);
                }
        }
}
Handling Events
The program needs to handle three main user events: mouse moves, mouse clicks, and keyboard presses.
When the mouse moves, we'd like to select and highlight the cell currently under the cursor, if any:
static void select_othello_cell(int row, int col)
{
        int old_row = grid.sel_row;
        int old_col = grid.sel_col;

        if (row == old_row && col == old_col) {
                /* This cell is already selected. */
                return;
        }

        grid.sel_row = row;
        grid.sel_col = col;

        if (old_row >= 0) {
                /* Re-draw the previously selected cell. */
                draw_othello_cell(old_row, old_col);
        }

        if (row >= 0) {
                /* Draw the newly selected cell. */
                draw_othello_cell(row, col);
        }
}

static void on_mouse_move(void)
{
        Window root, child;
        int root_x, root_y, win_x, win_y, row, col;
        unsigned mask;

        if (!XQueryPointer(display, win, &root, &child, &root_x, &root_y,
                           &win_x, &win_y, &mask)) {
                return;
        }

        if (grid_hit_test(win_x, win_y, &row, &col)) {
                select_othello_cell(row, col);
        } else {
                select_othello_cell(-1, -1);
        }
}
Because we used PointerMotionHintMask when registering for events, we are not guaranteed to receive an event for each position the mouse moves through. Instead, we receive notifications after the mouse has moved, and then requests the exact position with XQueryPointer. This cuts down on the number of events that has to be processed.
A mouse click is taken as a request to make a move in the currently selected cell, or to start a new game if the current one has finished:
static void new_game(void)
{
        othello_init(&board);
        state = BLACKS_MOVE;
}

static void on_mouse_click(void)
{
        if (state == GAME_OVER) {
                new_game();
                return;
        }

        if (state == BLACKS_MOVE && grid.sel_row >= 0) {
                make_move(grid.sel_row, grid.sel_col);
        }
}
The keyboard can be used to quit the game, make a move or select a cell. XLookupKeysym is used to determine which key, or KeySym, was pressed:
static void on_key_press(XKeyEvent *xkey, bool *quit, bool *draw)
{
        int row, col;

        row = grid.sel_row;
        col = grid.sel_col;

        switch (XLookupKeysym(xkey, 0)) {
        default:
                return;
        case XK_q:
                *quit = true;
                return;
        case XK_space:
        case XK_Return:
                on_mouse_click();
                *draw = true;
                return;
        case XK_Right: col++; break;
        case XK_Left:  col--; break;
        case XK_Down:  row++; break;
        case XK_Up:    row--; break;
        case XK_a:     col = 0; break;
        case XK_b:     col = 1; break;
        case XK_c:     col = 2; break;
        case XK_d:     col = 3; break;
        case XK_e:     col = 4; break;
        case XK_f:     col = 5; break;
        case XK_g:     col = 6; break;
        case XK_h:     col = 7; break;
        case XK_1:     row = 0; break;
        case XK_2:     row = 1; break;
        case XK_3:     row = 2; break;
        case XK_4:     row = 3; break;
        case XK_5:     row = 4; break;
        case XK_6:     row = 5; break;
        case XK_7:     row = 6; break;
        case XK_8:     row = 7; break;
        }

        select_othello_cell(max(0, min(row, 7)), max(0, min(col, 7)));
}
Making Moves
When either player makes a move, we need to update the board, figure out whose turn it is or whether the game is over, and if it becomes white's turn we need to compute its next move:
/* Make a move for the current player and transition the game state. */
static void make_move(int row, int col)
{
        assert(state == BLACKS_MOVE || state == WHITES_MOVE);

        if (state == BLACKS_MOVE) {
                if (!othello_is_valid_move(&board, PLAYER_BLACK, row, col)) {
                        /* Illegal move; ignored. */
                        return;
                }

                othello_make_move(&board, PLAYER_BLACK, row, col);
                state = WHITES_MOVE;
        } else {
                othello_make_move(&board, PLAYER_WHITE, row, col);
                state = BLACKS_MOVE;
        }

        if (!othello_has_valid_move(&board, PLAYER_BLACK) &&
            !othello_has_valid_move(&board, PLAYER_WHITE)) {
                state = GAME_OVER;
        } else if (state == WHITES_MOVE &&
                   !othello_has_valid_move(&board, PLAYER_WHITE)) {
                state = BLACKS_MOVE;
        } else if (state == BLACKS_MOVE &&
                   !othello_has_valid_move(&board, PLAYER_BLACK)) {
                state = WHITES_MOVE;
        }

        if (state == WHITES_MOVE) {
                compute_white_move();
        }
}
When computing white's move, it's important not to do so on the main thread. Doing non-trivial work on the same thread that handles user interface events is a cardinal sin, as it makes the program feel unresponsive and frustrates the user. In our case, we must for example be able to redraw the board if the window is moved.
It turns out that interacting with Xlib from multiple threads is fraught with peril. In particular, I couldn't find a reliable way to send an event from a background thread to the main thread.
Ideally, we would like to be able to wait for two events at the same time: regular X events and notifications that white's move has been computed. Remember that X is a network protocol, so Xlib is using a socket to communicate with the server. We can get the file descriptor for this socket using XConnectionNumber, and we can use select(2) to wait for events on that and other file descriptors at the same time.
Therefore, we will use a pipe(2) to communicate white's move back to the event loop, and we use fork(2) to create a separate process for computing the move — classic Unix inter-process communication:
static int white_move_pipe[2]; /* [0] for reading, [1] for writing. */

static void compute_white_move(void)
{
        int x, row, col;
        char c;

        assert(state == WHITES_MOVE);

        /* Compute white's move in a background process. */
        if ((x = fork()) == -1) {
                err("fork() failed: %s", strerror(errno));
        } else if (x != 0) {
                /* Parent process. */
                return;
        }

        /* Child process: compute the move and send it through the pipe. */
        othello_compute_move(&board, PLAYER_WHITE, &row, &col);
        c = (char)(row * 8 + col);
        if (write(white_move_pipe[1], &c, 1) != 1) {
                err("write() failed");
        }

        exit(EXIT_SUCCESS);
}
Event Loop and main
The event loop is the heart of our program. It calls XPending to check if there are events ready to be processed, otherwise it uses the technique explained above to wait for either a new event or a white move.
In addition to the mouse and keyboard events described previously, there are some other events we need to handle. ConfigureNotify reports changes to a window's configuration (size, position and such), including its initial one. Expose events fire when the window (or part of it) becomes exposed, such as when it is first shown, or if it was previously hidden by another window.
After creating and mapping the window, we will first receive a ConfigureNotify event, then an Expose event, and then we're in business, ready for the user's input.
static void event_loop(void)
{
        int display_fd;
        bool quit, draw;
        fd_set fds;
        XEvent event;
        char c;

        display_fd = XConnectionNumber(display);
        quit = false;
        draw = false;

        while (!quit) {
                if (draw) {
                        draw_grid();
                        draw = false;
                }

                if (XPending(display) == 0) {
                        /* Wait for X event or a white move. */
                        FD_ZERO(&fds);
                        FD_SET(display_fd, &fds);
                        FD_SET(white_move_pipe[0], &fds);
                        if (select(max(display_fd, white_move_pipe[0]) + 1,
                                   &fds, NULL, NULL, NULL) == -1) {
                                err("select() failed: %s", strerror(errno));
                        }

                        if (FD_ISSET(white_move_pipe[0], &fds)) {
                                /* Read white move from the pipe. */
                                if (read(white_move_pipe[0], &c, 1) != 1) {
                                        err("read() failed");
                                }
                                make_move(c / 8, c % 8);
                                draw = true;
                                continue;
                        }
                }

                XNextEvent(display, &event);

                switch (event.type) {
                case ConfigureNotify:
                        /* The window's configuration has changed. */
                        compute_grid_position(event.xconfigure.width,
                                              event.xconfigure.height);
                        break;
                case Expose:
                        /* The window has become visible. */
                        if (event.xexpose.count == 0) {
                                draw = true;
                        }
                        break;
                case MotionNotify:
                        on_mouse_move();
                        break;
                case KeyPress:
                        on_key_press(&event.xkey, &quit, &draw);
                        break;
                case ButtonPress:
                        on_mouse_move();
                        on_mouse_click();
                        draw = true;
                        break;
                case ClientMessage:
                        if (event.xclient.data.l[0] == wm_delete_window) {
                                /* Window closed. */
                                quit = true;
                        }
                        break;
                }
        }
}
Finally, main ties it all together: initializing, running the event loop until it's time to quit, and freeing resources in the end.
int main(int argc, char **argv)
{
        if (pipe(white_move_pipe) != 0) {
                err("pipe() failed: %s\n", strerror(errno));
        }

        grid.sel_row = -1;
        init(argc, argv);
        new_game();

        event_loop();

        XFreeGC(display, black_gc);
        XFreeGC(display, white_gc);
        XFreeGC(display, board_gc);
        XFreeGC(display, highlight_gc);
        XFreeFont(display, font);
        XCloseDisplay(display);

        return 0;
}
Building
If it's not already installed, you may need to install Xlib and XPM in order to build the program. On a Debian system:
$ sudo apt-get install libx11-dev libxpm-dev
To compile, link and run:
$ gcc -O3 -march=native -DNDEBUG othello.c x11_othello.c -lX11 -lXpm -o othello
$ ./othello
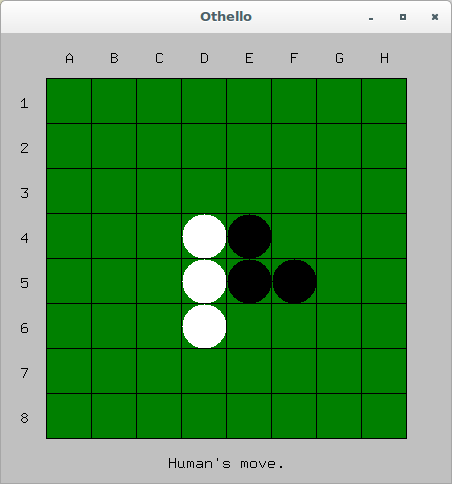
On my machine, it looks like the first of the images below (click for larger versions).
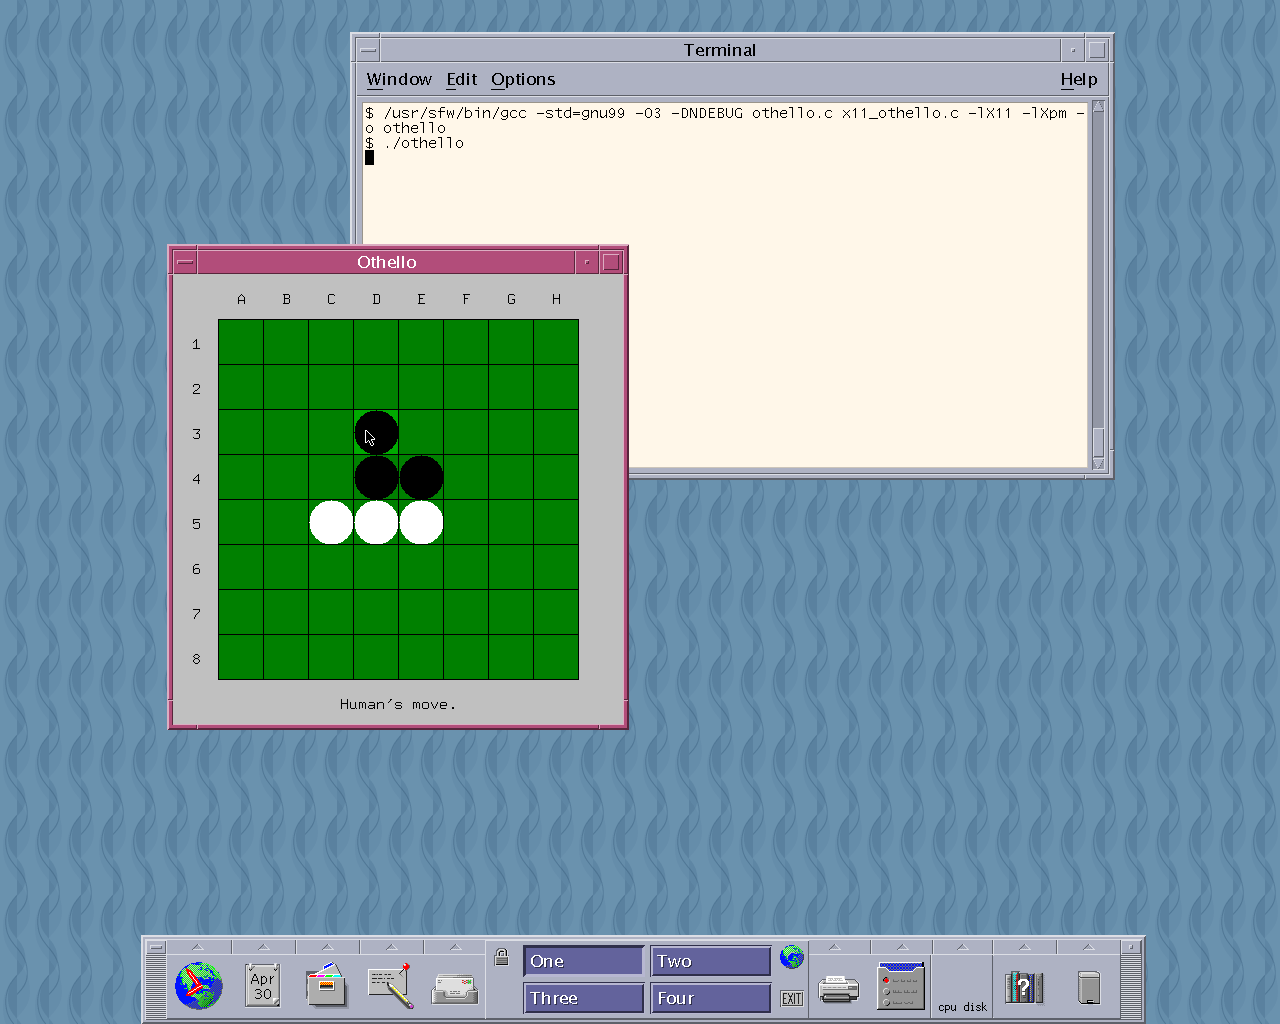
Because it's written in C and has few dependencies, the program should be extremely portable and run on most Unix systems. The second image shows it in the Common Desktop Environment on an old version of Solaris.
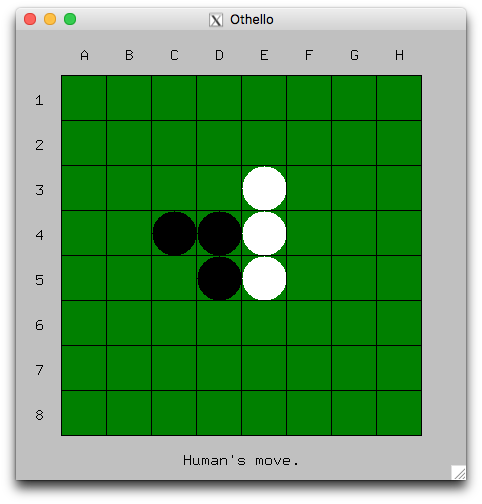
It is also possible to run the program on Mac. macOS is based on Unix, but no longer comes with an X server. However, the one that used to be included can be downloaded from XQuartz.org. Once that's installed, our program can be compiled with:
$ clang -O3 -march=native -DNDEBUG othello.c x11_othello.c \
           -I/usr/X11/include -L/usr/X11/lib -lX11 -lXpm -o othello
The third image below shows the program running on Mac. Note that it doesn't blend in as well as the native Mac port.
Windows
Besides a few early years of using MS-DOS, Windows is the operating system I grew up with, and it is still the most widely used OS on desktop computers. After having switched to Linux, using Windows mostly feels cumbersome; however, learning Windows programming does have a certain thrill to it. Perhaps it's the nostalgia, or maybe it's the engineering challenge of overcoming the ugliness and building something useful in a hostile environment — a little bit of order out of chaos.
Win32, the 32-bit version of the Windows API, was introduced with the release of Windows NT in July 1993. There have been many APIs and technologies for Windows development since (see Joel Spolsky's rant), but Win32 remains the truly native way for applications to interact with Windows.
I used Charles Petzold's Programming Windows (5th ed.) as a tutorial to Win32. It appears to be out of print, but used copies are easy to buy online. There is a sixth edition available, but that doesn't seem to cover Win32, instead focusing on C# and XAML to build Metro/UWP (the name keeps changing) apps.
Initialization and Message Loop
Graphical Windows programs start in a function called WinMain as opposed to main used by standard C programs. This allows the operating system to pass in a few extra parameters (and tells the linker which subsystem to use for the executable). In win_othello.c:
#define CELL_GAP 1       /* Cell gap in pixels. */
#define MIN_SIZE 300     /* Minimum window size. */
#define INIT_SIZE 450    /* Initial window size. */
#define WM_WHITE_MOVE (WM_USER + 0)

static const char APP_NAME[] = "othello";
static HBRUSH background_brush, board_brush, highlight_brush,
              white_brush, black_brush;

static othello_t board;
static enum { BLACKS_MOVE, WHITES_MOVE, GAME_OVER } state;

int WINAPI WinMain(HINSTANCE instance, HINSTANCE prev_instance,
                   LPSTR cmd_line, int cmd_show)
{
        WNDCLASS window_class;
        HWND window;
        HACCEL accelerators;
        MSG message;
The instance parameter is a handle to the current instance of the program. It will be used for example when requesting resources from the program, such as the icon. The prev_instance parameter was historically (before 32-bit Windows) used to refer to any already running instance of the program. It is no longer used.
The cmd_line parameter is a char* pointing at the command-line arguments, not including the program name, as a single string. (CommandLineToArgvW allows for getting an argument array instead, similar to argc and argv in regular C programs.)
The cmd_show parameter specifies how the window should be shown initially (minimized, maximized or normal). It will be used when the window is shown later.
WINAPI is a macro that expands to __stdcall, a calling convention used by most functions in the Windows API. It specifies that arguments to the function should be passed on the stack like regular C-style (__cdecl) calls, but that the called function must remove the arguments from the stack before returning ("callee cleanup"), relieving the calling function of that responsibility. The idea was probably to allow user programs to save a few instructions by letting the system libraries do the cleanup. (See Raymond Chen's The History of Calling Conventions, part 1 2 3 4 5.)
First we initialize the game state:
        grid.sel_row = -1;
        new_game();
Then we define brushes for the various colours that will be used. A brush is used when drawing filled shapes like circles or rectangles, and when drawing text. There are also pen objects which are used for drawing outlines, like the border around a square.
        background_brush = CreateSolidBrush(GetSysColor(COLOR_BTNFACE));
        board_brush      = CreateSolidBrush(RGB(0x00, 0x80, 0x00));
        highlight_brush  = CreateSolidBrush(RGB(0x00, 0xAA, 0x00));
        white_brush      = CreateSolidBrush(RGB(0xFF, 0xFF, 0xFF));
        black_brush      = CreateSolidBrush(RGB(0, 0, 0));
The WNDCLASS object is used to specify properties of the window we are about to create:
        window_class.style         = CS_HREDRAW | CS_VREDRAW;
        window_class.lpfnWndProc   = &wnd_proc;
        window_class.cbClsExtra    = 0;
        window_class.cbWndExtra    = 0;
        window_class.hInstance     = instance;
        window_class.hIcon         = LoadIcon(instance,
                                              MAKEINTRESOURCE(IDI_ICON));
        window_class.hCursor       = LoadCursor(NULL, IDC_ARROW);
        window_class.hbrBackground = background_brush;
        window_class.lpszMenuName  = MAKEINTRESOURCE(IDM_MENU);
        window_class.lpszClassName = APP_NAME;
The most important property is lpfnWndProc which specifies the window procedure, a function which handles messages sent to a window of that class. (lpfn stands for "long pointer to function"; Win32 uses Hungarian notation for most names.) CS_HREDRAW and CS_VREDRAW specify that the window must be redrawn if the horizontal or vertical size changes. We also specify the cursor and background colour, as well as the icon, which is loaded from a resource identified as IDI_ICON. The menu is specified by lpszMenuName, referring to another resource, and finally we set lpszClassName which is the name by which we will refer to the window class.
The window class is registered with a call to RegisterClassA, and we create a window of that class with CreateWindowA, specifying the window name (title), initial size, etc.
        if (!RegisterClassA(&window_class)) {
                err("RegisterClassA failed!");
        }

        window = CreateWindowA(APP_NAME, "Othello", WS_OVERLAPPEDWINDOW,
                               CW_USEDEFAULT, CW_USEDEFAULT,
                               INIT_SIZE, INIT_SIZE,
                               NULL, NULL, instance, NULL);
Like the two functions called above, many functions in the Win32 API have an A or W suffix. These are function variants that take ASCII or UTF-16 (wide character) strings. There is usually a macro, for example RegisterClass, that expands to the A or W variant based on whether the UNICODE macro is defined. The TEXT (or _T) macros can be used for string literals, for example TEXT("Othello") expands to "Othello" (of type char[]) or L"Othello (of type wchar_t[]) depending on whether UNICODE is defined. The motivation for this clever but confusing mechanism is to allow for building the same program with or without Unicode support based on a single macro. However, modern programs should probably always support Unicode if they accept text input, and referring to functions explicitly by their real name, A or W suffix included, avoids potential confusion about which function is being called. (See the UTF-8 Everywhere Manifesto, in particular How to do text on Windows.)
Now we are ready to show the window (ShowWindow) and tell it to paint itself (UpdateWindow):
        ShowWindow(window, cmd_show);
        UpdateWindow(window);
Once the window is ready, the program spends the rest of its lifetime processing messages, or events, in what is called a message loop:
        accelerators = LoadAccelerators(instance, MAKEINTRESOURCE(IDA_ACC));

        while (GetMessage(&message, NULL, 0, 0)) {
                if (!TranslateAccelerator(window, accelerators, &message)) {
                        TranslateMessage(&message);
                        DispatchMessage(&message);
                }
        }
LoadAccelerators loads a table of accelerators, that is, keyboard shortcuts (a resource defined together with the menu). GetMessage waits for and gets the next window message from the application's message queue. It returns a non-zero value unless the message is WM_QUIT, in which case we exit the message loop.
We use TranslateAccelerator to check if the message is the invocation of a keyboard shortcut. If it is, the function will call the window procedure, and we don't need to process the message further here.
TranslateMessage is used to translate keystroke messages to character messages. For example, if an "a" key press message is received while the "shift" key is pressed, TranslateMessage will generate an "A" character message to be fetched with the next GetMessage call. Since our program doesn't accept text input, this isn't strictly necessary, but writing the message loop like this is a standard pattern.
After any "translation", the message is dispatched to the message destination's window procedure with DispatchMessage.
After the message loop, we clean up and exit with the parameter of the WM_QUIT message as status code:
        DeleteObject(background_brush);
        DeleteObject(board_brush);
        DeleteObject(highlight_brush);
        DeleteObject(white_brush);
        DeleteObject(black_brush);

        return message.wParam;
}
Resources
Resources are various pieces of data that can be included in an executable (or DLL) file and referred to by programs. In WinMain above, we refer to resources for the program's icon, menu and accelerator table.
The resources we use have numerical identifiers (strings can also be used as identifiers), which we define in a regular header file, win_othello_res.h:
#define IDI_ICON        1
#define IDM_MENU        2
#define IDM_NEW_GAME    3
#define IDM_EXIT        4
#define IDA_ACC         5
A resource-definition script, win_othello_res.rc, is then used to define the resources:
#include "win_othello_res.h"
#include "windows.h"

IDI_ICON ICON "icons/othello.ico"

IDM_MENU MENU
BEGIN
        POPUP "&Game"
        BEGIN
                MENUITEM "&New Game\tF2", IDM_NEW_GAME
                MENUITEM SEPARATOR
                MENUITEM "E&xit",         IDM_EXIT
        END
END

IDA_ACC ACCELERATORS
BEGIN
        VK_F2,  IDM_NEW_GAME,   VIRTKEY
END
The .rc file supports C preprocessor directives like #include, but mainly consists of resource-definition statements. Each such statement defines a resource with a numeric or string id, and type.
The first statement defines an ICON resource with the numerical identifier IDI_ICON (defined as 1 in the header file). Its content is provided by the othello.ico file.
We define a MENU resource with the identifier IDI_MENU to use as our main menu. The sub-statements define the structure and contents of the menu, and numerical identifiers to use when each menu item is activated. (The identifier will be a parameter of a WM_COMMAND message). Using & in a title makes the following character appear underlined and act as a keyboard shortcut. For example, ALT-G will open the "Game" menu.
The ACCELERATORS resource defines keyboard shortcuts and what numeric id to use when they're invoked. In our case we want the F2 key to have the same effect as the "New Game" menu option.
These are the most common types of resources, but there are several others, and one can define custom ones to include any kind of data.
To include the resources in our program, the Resource Compiler rc.exe is used to compile the .rc file and its dependencies (like othello.ico) into an intermediate .res file, which the linker will then bake into the executable of the program (see Building below).
Drawing
The drawing strategy is exactly the same as for the X11 port: we use a 10-by-10 grid of equal-size quadratic cells, with the Othello board occupying the middle 8-by-8 cells.
Computing the grid's position and hit testing is done exactly as for X11:
static struct {
        int x, y;       /* Position of the grid relative to window origin. */
        int size;       /* Size (width and height are equal) of the grid. */
        int cell_size;  /* Size of a grid cell, not including its border. */
        int sel_row;    /* Currently selected row, or -1 if none. */
        int sel_col;    /* Currently selected column. */
} grid;

/* Compute the grid's size and position in the window. */
static void compute_grid_position(int win_width, int win_height)
{
        /* The grid is a 10x10 grid. The 8x8 centre is the Othello
           board, the top row and left column are used for labels, and the
           bottom row for status text. */

        grid.cell_size = (min(win_width, win_height) - 9 * CELL_GAP) / 10;
        grid.size = grid.cell_size * 10 + 9 * CELL_GAP;
        grid.x = win_width / 2 - grid.size / 2;
        grid.y = win_height / 2 - grid.size / 2;
}

/* Check whether the position is over an Othello cell. */
static bool grid_hit_test(int x, int y, int *row, int *col)
{
        *row = (y - grid.y) / (grid.cell_size + CELL_GAP) - 1;
        *col = (x - grid.x) / (grid.cell_size + CELL_GAP) - 1;

        if (*row >= 0 && *row < 8 && *col >= 0 && *col < 8) {
                return true;
        }

        return false;
}
Drawing is done with a part of the Win32 API called GDI (Graphics Device Interface). The drawing commands are performed with reference to a Device Context which the system provides for us.
/* Draw an Othello cell and its contents. */
static void draw_othello_cell(HDC dc, int row, int col)
{
        int x, y;
        bool highlight;
        cell_state_t cs;

        x = grid.x + (col + 1) * (grid.cell_size + CELL_GAP);
        y = grid.y + (row + 1) * (grid.cell_size + CELL_GAP);

        highlight = (row == grid.sel_row && col == grid.sel_col &&
                     state == BLACKS_MOVE);

        /* Draw the cell background. */
        SelectObject(dc, GetStockObject(NULL_PEN));
        SelectObject(dc, highlight ? highlight_brush : board_brush);
        Rectangle(dc, x, y, x + grid.cell_size, y + grid.cell_size);

        if ((cs = othello_cell_state(&board, row, col)) != CELL_EMPTY) {
                /* Draw the disk. */
                SelectObject(dc, cs == CELL_BLACK ? black_brush : white_brush);
                Ellipse(dc, x, y, x + grid.cell_size, y + grid.cell_size);
        }
}

/* Draw string s of length len centered at (x,y). */
static void draw_string(HDC dc, const char *s, int len, int x, int y)
{
        SIZE size;

        GetTextExtentPoint32A(dc, s, len, &size);
        TextOut(dc, x - size.cx / 2, y - size.cy / 2, s, len);
}

/* Draw the grid and its contents. */
static void draw_grid(HDC dc)
{
        int row, col, x, y, bs, ws;
        char status[128];

        /* Draw a background square around the 8x8 centre cells. */
        SelectObject(dc, GetStockObject(NULL_PEN));
        SelectObject(dc, black_brush);
        Rectangle(dc, grid.x + grid.cell_size,
                      grid.y + grid.cell_size,
                      grid.x + 9 * grid.cell_size + 9 * CELL_GAP,
                      grid.y + 9 * grid.cell_size + 9 * CELL_GAP);

        /* Draw labels. */
        for (row = 0; row < 8; row++) {
                x = grid.x + grid.cell_size / 2;
                y = grid.y + (row + 1) * (grid.cell_size + CELL_GAP) +
                        grid.cell_size / 2;
                draw_string(dc, &"12345678"[row], 1, x, y);

        }
        for (col = 0; col < 8; col++) {
                x = grid.x + (col + 1) * (grid.cell_size + CELL_GAP) +
                        grid.cell_size / 2;
                y = grid.y + grid.cell_size / 2;
                draw_string(dc, &"ABCDEFGH"[col], 1, x, y);
        }

        /* Draw status text. */
        switch (state) {
        case BLACKS_MOVE:
                sprintf(status, "Human's move.");
                break;
        case WHITES_MOVE:
                sprintf(status, "Computer's move..");
                break;
        case GAME_OVER:
                bs = othello_score(&board, PLAYER_BLACK);
                ws = othello_score(&board, PLAYER_WHITE);
                if (bs > ws) {
                        sprintf(status, "Human wins %d-%d!", bs, ws);
                } else if (ws > bs) {
                        sprintf(status, "Computer wins %d-%d!", ws, bs);
                } else {
                        sprintf(status, "Draw!");
                }
        }
        draw_string(dc, status, strlen(status), grid.x + grid.size / 2,
                    grid.y + grid.size - grid.cell_size / 2);

        /* Draw cells. */
        for (row = 0; row < 8; row++) {
                for (col = 0; col < 8; col++) {
                        draw_othello_cell(dc, row, col);
                }
        }
}
Handling Events
Separate functions are used to handle events that need more than a few lines of code to process. We call InvalidateRect when the window needs repainting, causing the system to send us a WM_PAINT message.
static void new_game(void)
{
        othello_init(&board);
        state = BLACKS_MOVE;
}

static void on_mouse_click(HWND window)
{
        if (state == GAME_OVER) {
                new_game();
                InvalidateRect(window, NULL, TRUE);
                return;
        }

        if (state == BLACKS_MOVE && grid.sel_row >= 0) {
                make_move(window, grid.sel_row, grid.sel_col);
        }
}
When a cell is selected, we take care to only invalidate that part of the window, and not clear (the false argument) but to paint over it. When only part of the window is invalidated, the next WM_PAINT message will run as usual, but only the painting operations inside the invalidated area will be applied. This avoids flickering from repainting the whole window each time a new cell is selected.
/* Invalidate an Othello cell, causing it to be repainted. */
static void invalidate_othello_cell(HWND window, int row, int col)
{
        RECT r;

        r.left = grid.x + (col + 1) * (grid.cell_size + CELL_GAP);
        r.top = grid.y + (row + 1) * (grid.cell_size + CELL_GAP);
        r.right = r.left + grid.cell_size;
        r.bottom = r.top + grid.cell_size;

        InvalidateRect(window, &r, false);
}

static void select_othello_cell(HWND window, int row, int col)
{
        int old_row = grid.sel_row;
        int old_col = grid.sel_col;

        if (row == old_row && col == old_col) {
                /* This cell is already selected. */
                return;
        }

        grid.sel_row = row;
        grid.sel_col = col;

        if (old_row >= 0) {
                /* Re-draw the previously selected cell. */
                invalidate_othello_cell(window, old_row, old_col);
        }

        if (row >= 0) {
                /* Need to draw the newly selected cell. */
                invalidate_othello_cell(window, row, col);
        }
}


static void on_key_press(HWND window, WPARAM wparam)
{
        int row, col;

        row = grid.sel_row;
        col = grid.sel_col;

        switch (wparam) {
        default:
               return;
        case VK_SPACE:
        case VK_RETURN:
                on_mouse_click(window);
                return;

        case VK_RIGHT: col++; break;
        case VK_LEFT:  col--; break;
        case VK_DOWN:  row++; break;
        case VK_UP:    row--; break;

        case 'A': case 'B': case 'C': case 'D':
        case 'E': case 'F': case 'G': case 'H':
                col = wparam - 'A';
                break;

        case '1': case '2': case '3': case '4':
        case '5': case '6': case '7': case '8':
                row = wparam - '1';
                break;
        }

        select_othello_cell(window, max(0, min(row, 7)), max(0, min(col, 7)));
}
Events, or messages, are processed by the window procedure, which in our program is implemented by the wnd_proc function.
Each message can take two mysteriously named parameters, wparam and lparam. The names are historical: before 32-bit Windows, the procedure used to take a 16-bit "word" parameter, used for handles and integers, and a 32-bit "long" parameter, used for pointers. With the introduction of Win32, both parameters became 32-bit values. (See Raymond Chen.)
The CALLBACK macro sets the calling convention to __stdcall, just as WINAPI did for WinMain. Again, the different macros exist for historical reasons; on 16-bit Windows they expanded to different things.
LRESULT is just a macro which expands to long. The appropriate return value depends on the message type, but returning zero usually means we processed the message successfully.
static LRESULT CALLBACK wnd_proc(HWND window, UINT message, WPARAM wparam,
                                 LPARAM lparam)
{
        HDC dc;
        PAINTSTRUCT ps;
        int row, col;

        switch (message) {
        case WM_SIZE:
                /* The window size changed. */
                compute_grid_position(LOWORD(lparam), HIWORD(lparam));
                return 0;

        case WM_GETMINMAXINFO:
                /* Windows is asking about the size constraints. */
                ((MINMAXINFO*)lparam)->ptMinTrackSize.x = MIN_SIZE;
                ((MINMAXINFO*)lparam)->ptMinTrackSize.y = MIN_SIZE;
                return 0;

        case WM_PAINT:
                /* The window needs a re-paint. */
                EnableMenuItem(GetMenu(window), IDM_NEW_GAME,
                               state != WHITES_MOVE ? MF_ENABLED : MF_GRAYED);
                dc = BeginPaint(window, &ps);
                SetBkMode(dc, TRANSPARENT);
                draw_grid(dc);
                EndPaint(window, &ps);
                return 0;

        case WM_MOUSEMOVE:
                /* The mouse moved. */
                if (grid_hit_test(LOWORD(lparam), HIWORD(lparam), &row, &col)) {
                        select_othello_cell(window, row, col);
                } else {
                        select_othello_cell(window, -1, -1);
                }
                return 0;

        case WM_LBUTTONUP:
                /* Left mouse button up. */
                on_mouse_click(window);
                return 0;

        case WM_KEYDOWN:
                /* Keyboard key down. */
                on_key_press(window, wparam);
                return 0;

        case WM_COMMAND:
                if (lparam == 0) {
                        /* Menu item activated. */
                        switch (LOWORD(wparam)) {
                        case IDM_NEW_GAME:
                                assert(state != WHITES_MOVE);
                                new_game();
                                InvalidateRect(window, NULL, TRUE);
                                return 0;

                        case IDM_EXIT:
                                PostQuitMessage(0);
                                return 0;
                        }
                }
                break;

        case WM_WHITE_MOVE:
                /* White computed a move. */
                assert(state == WHITES_MOVE);
                make_move(window, wparam, lparam);
                return 0;

        case WM_DESTROY:
                /* The window is closing. */
                PostQuitMessage(0);
                return 0;
        }

        return DefWindowProc(window, message, wparam, lparam);
}
Making Moves
The code for updating the game state with a new move is almost exactly the same as for the X11 version:
/* Make a move for the current player and transition the game state. */
static void make_move(HWND window, int row, int col)
{
        assert(state == BLACKS_MOVE || state == WHITES_MOVE);

        if (state == BLACKS_MOVE) {
                if (!othello_is_valid_move(&board, PLAYER_BLACK, row, col)) {
                        /* Illegal move; ignored. */
                        return;
                }

                othello_make_move(&board, PLAYER_BLACK, row, col);
                state = WHITES_MOVE;
        } else {
                othello_make_move(&board, PLAYER_WHITE, row, col);
                state = BLACKS_MOVE;
        }

        if (!othello_has_valid_move(&board, PLAYER_BLACK) &&
            !othello_has_valid_move(&board, PLAYER_WHITE)) {
                state = GAME_OVER;
        } else if (state == WHITES_MOVE &&
                   !othello_has_valid_move(&board, PLAYER_WHITE)) {
                state = BLACKS_MOVE;
        } else if (state == BLACKS_MOVE &&
                   !othello_has_valid_move(&board, PLAYER_BLACK)) {
                state = WHITES_MOVE;
        }

        if (state == WHITES_MOVE) {
                _beginthread(compute_white_move, 0, (void*)window);
        }

        InvalidateRect(window, NULL, TRUE);
}
One thing that's different is how we compute white's move. On Windows, it's easy to send a message from one thread to another in a safe way, so that's what we do. _beginthread starts execution of compute_white_move on a new thread. When the computation is done, it simply sends a message to our window that we handle in the message loop:
static void compute_white_move(void *window)
{
        int row, col;

        assert(state == WHITES_MOVE);

        othello_compute_move(&board, PLAYER_WHITE, &row, &col);
        SendMessage((HWND)window, WM_WHITE_MOVE, row, col);
}
WM_WHITE_MOVE is a message number that we defined ourselves, based on the WM_USER macro. We exploit the fact that messages take two parameters, and pass the computed row in wparam and the column in lparam.
We have to take care to make sure our program is thread safe. While compute_white_move accesses the Othello board on its thread, the main thread must not be allowed to change the board. The code makes sure that while in the WHITES_MOVE state, the board is never changed until the WM_WHITE_MOVE message is received. Note that for this reason, the "New Game" menu option is disabled when it's white's turn.
Building
The program can be built with the compiler from Visual Studio (I used the free version, Visual Studio Express) by running the following commands in a Visual Studio Developer Command Prompt (the name varies a little between versions, but it should be available in the Start menu, somewhere in the Visual Studio folder).
First we compile the resource file to a .res file:
C:\othello>rc win_othello_res.rc
Microsoft (R) Windows (R) Resource Compiler Version 10.0.10011.16384
Copyright (C) Microsoft Corporation.  All rights reserved.
Next, the C files are compiled. /O2 means optimization for maximum speed, and /DNDEBUG disables the asserts. /MT makes our program link statically against the C run-time library, which means we don't need to distribute the C run-time DLL with our executable.
C:\othello>cl /c /O2 /DNDEBUG /MT win_othello.c othello.c
Microsoft (R) C/C++ Optimizing Compiler Version 19.00.23506 for x86
Copyright (C) Microsoft Corporation.  All rights reserved.

win_othello.c
othello.c
Generating Code...
And finally we link it all together into an executable:
C:\othello>link /out:othello.exe win_othello.obj othello.obj win_othello_res.res
 user32.lib gdi32.lib
Microsoft (R) Incremental Linker Version 14.00.23506.0
Copyright (C) Microsoft Corporation.  All rights reserved.
This creates an executable that will run on Windows Vista or later. However, our code is not using any new fancy APIs — in fact everything it uses was present in Win32 from the very beginning. Would it be possible to build our program so that it runs on all versions of Windows that support Win32?
The problem is that the libraries in current versions of the Windows SDK only work with Windows XP and later, as they end up referencing functionality that was not present in older versions of Windows. We need an older SDK. The Wikipedia article provides some download links, but another way is to install an older version of Visual Studio, as they include contemporary SDKs.
I used "Visual C++ .NET Standard 2003". Unfortunately, despite the year it was released in, the included compiler cannot handle basic C99 features (such as stdint.h) that are used in the Othello program. But since all we wanted was the libraries, we can use Clang for the actual compilation.
In a Visual Studio .NET 2003 Command Prompt:
C:\othello>rc win_othello_res.rc

C:\othello>clang-cl /c /O2 /DNDEBUG /MT /arch:IA32 win_othello.c othello.c

C:\othello>link /out:othello.exe win_othello.obj othello.obj win_othello_res.res
 user32.lib gdi32.lib
Microsoft (R) Incremental Linker Version 7.10.3077
Copyright (C) Microsoft Corporation.  All rights reserved.
That produces an executable that will run on Windows NT 4.0 or later. However, the binary might still work if we could convince older versions of Windows to load it. This is determined by the subsystem version field in the PE header of the executable (see Ones and Zeros, Part 2: Executables), and we can change it to 3.10, the version number of the first Windows NT release, like this:
C:\othello>editbin /subsystem:windows,3.10 othello.exe
Microsoft (R) COFF/PE Editor Version 7.10.3077
Copyright (C) Microsoft Corporation.  All rights reserved.
It works! The screenshots below show the executable running on Windows NT 3.51 and Windows 10, versions that were released more than twenty years apart. For some reason, I find this extremely satisfying. (Perhaps in this sense, our executable is a lot more universal than programs using the newfangled Universal Windows Platform model?)
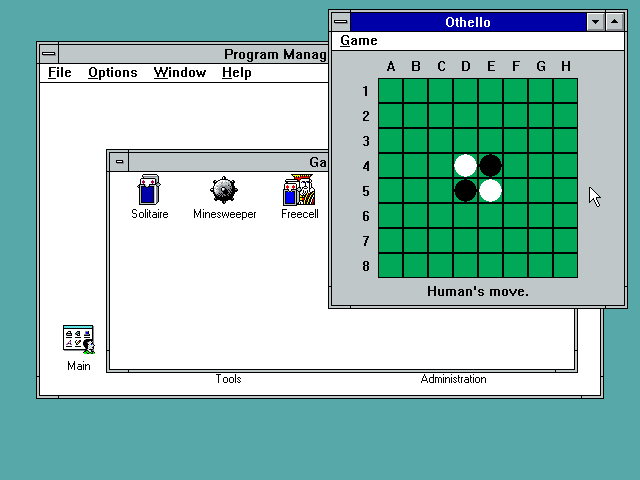
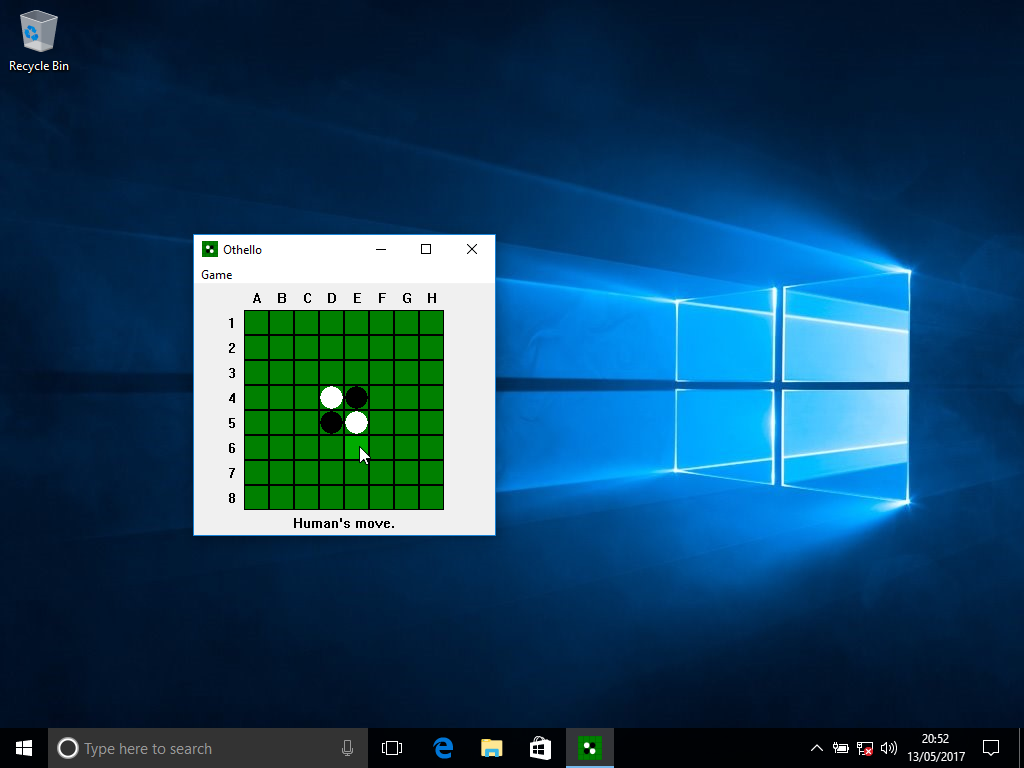
The Windows executable can also be built on Linux using the mingw-w64 toolchain:
$ sudo apt-get install mingw-w64
$ i686-w64-mingw32-windres win_othello_res.rc win_othello_res.o
$ i686-w64-mingw32-gcc -O3 -DNDEBUG othello.c win_othello.c win_othello_res.o \
                -o othello.exe -luser32 -lgdi32 -mwindows
Mac
Applications for macOS (originally called Mac OS X and later just OS X) have traditionally been written in Objective-C using the Cocoa framework. The history of this operating system is quite fascinating, and Amit Singh provides an excellent account of it in the online extended version of the first chapter of his book, Mac OS X Internals.
Objective-C is a Smalltalk-inspired object-oriented extension of C created by Brad Cox and Tom Love in the eighties. It was licensed by NeXT, Steve Jobs's start-up after his ejection from Apple, for use in their NeXTSTEP operating system. After Apple's acquisition of NeXT, much of the software ended up in Mac OS X, including the use of Objective-C and the software "kits" which became Cocoa. (One plausible theory is that the name is a play on Java, considered hot stuff at the time, and a way to recycle the trademark of an old Cocoa product.)
As opposed to C, C++, and other languages that are standardised by organizations such as ISO, Objective-C is implementation defined: the language is what the toolchain in Xcode implements. There are plenty of guides and such, but frustratingly there is no actual language specification.
(In 2014, Apple introduced the Swift programming language, which seems to have become the language of choice for new development on Mac. However, I'm sticking with Objective-C here because I was curious about its history and I run into it at work sometimes.)
To learn about Mac programming, I mainly used the fourth edition (the last one based on Objective-C) of Hillegass & Preble "Cocoa Programming For Mac OS X" (Addison-Wesley 2012). I also read parts of Amit Singh's Mac OS X Internals, some of Brad Cox's "Object Oriented Programming: An Evolutionary Approach" (Addison-Wesley 1986) which is the original description of the language, and I peeked in David Chisnall's "Cocoa Programming Developer's Handbook" (Addison-Wesley 2009) which is not new but very rich in technical detail.
Anatomy of a Mac Application
On Linux and Windows, our Othello programs consist of a single executable file. On Mac however, most apps consist of multiple files that make up an application bundle.
A bundle is a directory that gets special treatment from the operating system due to its filename extension, such as .app for application bundles. For example, our application will be a directory called Othello.app. In Finder, it looks like a single file called Othello, and starts when double-clicked on, but in a terminal we can see that it is just a directory of files:
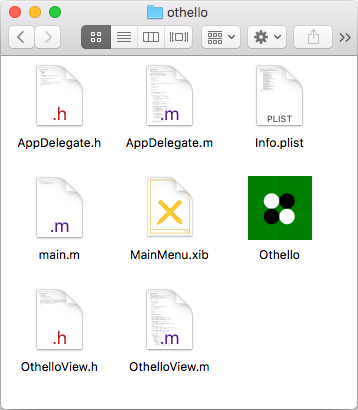
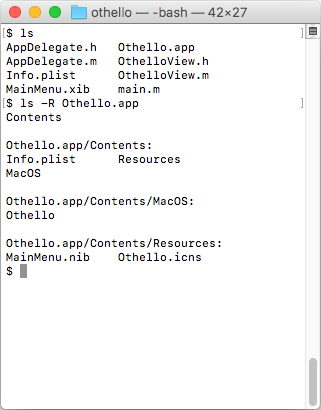
(To start the application bundle from a terminal, run open Othello.app. To see the contents of a bundle in Finder, Ctrl-click on it and select Show Package Contents.)
Bundles are a nice way to keep applications in a self-contained package. Installing a program on macOS usually just means dragging the bundle into the Applications folder.
Inside the bundle is an information property list, Info.plist, which contains metadata about the bundle:
<?xml version="1.0" encoding="UTF-8"?>
<!DOCTYPE plist PUBLIC "-//Apple//DTD PLIST 1.0//EN"
"http://www.apple.com/DTDs/PropertyList-1.0.dtd">
<plist version="1.0">
<dict>
	<key>CFBundleDevelopmentRegion</key>
	<string>en</string>
	<key>CFBundleDisplayName</key>
	<string>Othello</string>
	<key>CFBundleExecutable</key>
	<string>Othello</string>
	<key>CFBundleIconFile</key>
	<string>Othello</string>
	<key>CFBundleIdentifier</key>
	<string>net.hanshq.Othello</string>
	<key>CFBundleInfoDictionaryVersion</key>
	<string>6.0</string>
	<key>CFBundleName</key>
	<string>Othello</string>
	<key>CFBundlePackageType</key>
	<string>APPL</string>
	<key>CFBundleShortVersionString</key>
	<string>1.2</string>
	<key>CFBundleVersion</key>
	<string>1.2</string>
	<key>NSHumanReadableCopyright</key>
	<string>Copyright © 2017 Hans Wennborg</string>
	<key>NSMainNibFile</key>
	<string>MainMenu</string>
	<key>NSPrincipalClass</key>
	<string>NSApplication</string>
	<key>LSMinimumSystemVersion</key>
	<string>10.7</string>
</dict>
</plist>
The file specifies things like version number, icon (Othello.icns from the Contents/Resources folder in the bundle), and most importantly, which executable to run when starting the application. In our case, the executable is called Othello (in the Contents/MacOS folder), and its main function is defined in main.m:
#import <Cocoa/Cocoa.h>

int main(int argc, const char **argv) {
    return NSApplicationMain(argc, argv);
}
This is an Objective-C source file (its extension is .m), but it doesn't really use any Objective-C features: main is the usual function from C, and it contains a regular function call and return statement. However, it does include an Objective-C header, Cocoa.h (for the declaration of NSApplicationMain). Objective-C headers are normally included with an #import directive, which is a language extension that works just like #include except that it guarantees to only include the file once, without any need for include guards.
(It's not entirely clear why Objective-C uses .m as the file extension. The best theory indicates that it is for "messages", a core concept in Objective-C.)
The only thing main does is call on NSApplicationMain, which will fire up the Cocoa application framework and load the main nib file from our application bundle, as specified by NSMainNibFile in the property list.
Nibs
Nibs are files generated by Interface Builder, which is part of Xcode these days. It was originally called NeXT Interface Builder, which is why the files had a .nib extension. Current versions of Interface Builder generate XML files with the extension .xib instead, but the files are still referred to as nibs, and they are converted to .nib files as part of the build process.
Nib files contain the serialization of an object graph (sometimes called a set of freeze-dried objects). That is, they describe a set of objects and connections between them. Those objects can be user interface elements such as windows, buttons, etc. along with attributes that define their appearance, or other objects. Connections allow objects to reference each other; for example, clicking a button might invoke some method on another object. When the framework loads a nib file, it instantiates the objects from the file and sets up the connections between them.
The screenshot below shows the nib for our Othello program in Xcode:
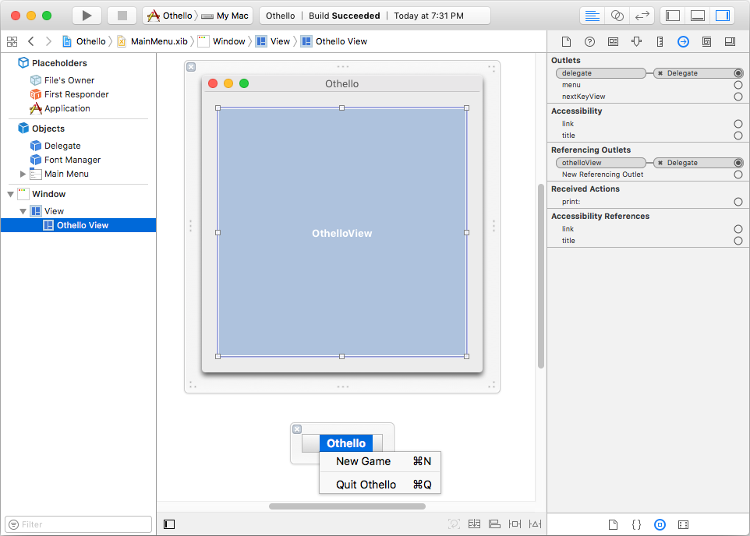
Here, Xcode has been used to create a custom OthelloView object that fills the window, as well as the main menu for our program.
Interface Builder has also been used to set up connections between objects. For example, the delegate outlet of the OthelloView (an outlet is a kind of instance variable) is connected to the AppDelegate object, which acts as the controller for our program.
Other connections, which are not visible in the screenshot above, can be seen in the .xib file itself, MainMenu.xib: (Apologies for the huge blob of XML, but that is what we get for using this kind of tool.)
<?xml version="1.0" encoding="UTF-8"?>
<document type="com.apple.InterfaceBuilder3.Cocoa.XIB" version="3.0" toolsVersion="11762"
systemVersion="16D32" targetRuntime="MacOSX.Cocoa" propertyAccessControl="none"
useAutolayout="YES" customObjectInstantitationMethod="direct">
  <dependencies>
    <deployment identifier="macosx"/>
    <plugIn identifier="com.apple.InterfaceBuilder.CocoaPlugin" version="11762"/>
    <capability name="documents saved in the Xcode 8 format" minToolsVersion="8.0"/>
  </dependencies>
  <objects>
    <customObject id="-2" userLabel="File's Owner" customClass="NSApplication">
      <connections>
        <outlet property="delegate" destination="1" id="15"/>
      </connections>
    </customObject>
    <customObject id="-1" userLabel="First Responder" customClass="FirstResponder"/>
    <customObject id="-3" userLabel="Application" customClass="NSObject"/>
    <customObject id="1" customClass="AppDelegate">
      <connections>
        <outlet property="newgameMenu" destination="2" id="12"/>
        <outlet property="othelloView" destination="3" id="13"/>
        <outlet property="window" destination="4" id="14"/>
      </connections>
    </customObject>
    <customObject id="16" customClass="NSFontManager"/>
    <menu title="Main Menu" systemMenu="main" id="5">
      <items>
        <menuItem title="Othello" id="6">
          <modifierMask key="keyEquivalentModifierMask"/>
          <menu key="submenu" title="Othello" systemMenu="apple" autoenablesItems="NO"
          id="7">
            <items>
              <menuItem title="New Game" keyEquivalent="n" id="2">
                <connections>
                  <action selector="newGame:" target="1" id="8"/>
                </connections>
              </menuItem>
              <menuItem isSeparatorItem="YES" id="9"/>
              <menuItem title="Quit Othello" keyEquivalent="q" id="10">
                <connections>
                  <action selector="terminate:" target="-1" id="11"/>
                </connections>
              </menuItem>
            </items>
          </menu>
        </menuItem>
      </items>
    </menu>
    <window title="Othello" allowsToolTipsWhenApplicationIsInactive="NO"
    autorecalculatesKeyViewLoop="NO" releasedWhenClosed="NO"
    animationBehavior="default" id="4">
      <windowStyleMask key="styleMask" titled="YES" closable="YES"
      miniaturizable="YES" resizable="YES"/>
      <windowPositionMask key="initialPositionMask" leftStrut="YES"
      rightStrut="YES" topStrut="YES" bottomStrut="YES"/>
      <rect key="contentRect" x="335" y="390" width="360" height="360"/>
      <rect key="screenRect" x="0.0" y="0.0" width="1920" height="1177"/>
      <view key="contentView" id="17">
        <rect key="frame" x="0.0" y="0.0" width="360" height="360"/>
        <autoresizingMask key="autoresizingMask"/>
        <subviews>
          <customView fixedFrame="YES" translatesAutoresizingMaskIntoConstraints="NO"
          id="3" customClass="OthelloView">
            <rect key="frame" x="20" y="20" width="320" height="320"/>
            <autoresizingMask key="autoresizingMask" widthSizable="YES"
            heightSizable="YES"/>
            <connections>
              <outlet property="delegate" destination="1" id="18"/>
            </connections>
          </customView>
        </subviews>
      </view>
    </window>
  </objects>
</document>
The connections element for the AppDelegate shows how it's connected to the "New Game" menu item, the OthelloView and the window. That means that when the nib is loaded, AppDelegate will be able to access those objects through its instance variables.
The file also defines actions. For example, when the user clicks the "New Game" menu item, a newGame: message will be sent to (Objective-C lingo for invoking a method) the AppDelegate.
There are some objects in the nib that were not defined by us. The "File's Owner" object (id -2) is the object that is loading the nib, in our case an instance of NSApplication whose actions were set in motion by the call to NSApplicationMain in the main function of our program. This is a big difference from Linux and Windows where we did a lot of the low-level work ourselves: here, NSApplication is running the show, and we cater to it with nibs and delegate classes.
Another special object is the "First Responder" (id -1). In the nib file, this isn't a specific object, but a place-holder to allow binding actions to the object that's currently chosen to receive keyboard events. That object is known as the first responder because it comes first in the chain of objects that respond to events. In our case, the "Quit Othello" menu item's action is set up to send a terminate: message to the first responder when invoked. The first responder for our program will be the OthelloView, but since it doesn't handle terminate: messages, they will get passed up the chain until they reach NSApplication, whose terminate: method terminates the application.
(It is possible to build Cocoa applications without nibs, which is appealing in some ways. However, certain things, such as defining menus, are tricky without using nibs.)
The Controller
Compared to the X and Windows ports, because we're using an object-oriented programming language and working with the Cocoa framework, the Model-View-Controller organization of our program becomes more explicit. The game is still modelled by the Othello engine we wrote above, the view will be implemented further below, and the controller is implemented here in the AppDelegate class. Perhaps it's not the best of names, but it is what Xcode gave me.
This is its header file, AppDelegate.h:
#import <Cocoa/Cocoa.h>
#include "../othello.h"

enum State { BLACKS_MOVE, WHITES_MOVE, GAME_OVER };

@interface AppDelegate : NSObject <NSApplicationDelegate> {
    othello_t board;
    enum State state;
}

// Get a pointer to the Othello board.
- (const othello_t*)board;

// Get the current state.
- (enum State)state;

// To be called when a cell on the board is clicked by the user.
- (void)boardWasClickedAtRow:(int)row Column:(int)col;

// Reset the game state.
- (IBAction)newGame:(id)sender;

@end
We recognize some of this as ordinary C code: the #include of our othello.h header and the declaration of the enumeration. Being able to interoperate easily with C is a key strength of Objective-C. Through the backwards compatibility with C, it lowers the threshold for adoption, as programmers can easily reuse their existing code. In our case, it means the Othello engine can be used seamlessly.
The block starting with @interface and ending with @end declares a class interface. Here we declare the AppDelegate class, which inherits from NSObject (all classes usually do), and conforms to the NSApplicationDelegate protocol.
A protocol is like an interface in Java: a set of methods, some of which may be optional, that a class can declare that it implements. A class can only have one superclass, but may conform to multiple protocols.
The declarations of board and state within the curly braces are instance variable declarations for the class. These variables are private to the implementation of the class.
Following the closing curly brace are method declarations. The return type is provided in parenthesis, followed by the name of the method with method arguments and their types separated by colons. The colon syntax comes from Smalltalk and aims to make method invocations more explicative. For example, when cell (1,2) is clicked on the board, we will send a boardWasClickedAtRow:1 Column:2 message. Apple's documentation provides some naming guidelines.
Method declarations are prefixed with either + or - signs. A plus sign signifies a class method, which is a method that can be invoked directly on the class, similar to a static method in Java and C++. One common use is the alloc method (typically inherited from NSObject) and other methods which create instances of a class. Method declarations prefixed by a minus sign are instance methods: they can only be invoked on instances of the class, not on the class itself.
IBAction is a macro that expands to void, but signals to Interface Builder that this method should be exposed as an action which other objects can invoke. In our case, we have connected the "New Game" menu option to this method.
The definition of our class is provided in AppDelegate.m, which begins like this:
#import "AppDelegate.h"
#import "OthelloView.h"

@interface AppDelegate ()
- (void)makeMoveAtRow:(int)row Column:(int)col;

@property (weak) IBOutlet NSWindow *window;
@property (weak) IBOutlet OthelloView *othelloView;
@property (weak) IBOutlet NSMenuItem *newgameMenu;
@end
This @interface declaration is a class extension of AppDelegate. The methods declared in the header file are all public. (Unlike C++ and Java, Objective-C does not have access modifiers such as public: and private:). Using a class extension allows us to add a private method makeMoveAtRow:Column: which is only available for internal use.
We also add properties, which are instance variables synthesized by the compiler. For each property, the compiler will generate getter and setter methods (for example, window and setWindow) to access the instance variable. Since we don't want the setters and getters to be public, the properties are declared in this class extension, rather than the public interface. The properties are marked IBOutlet, which means they will show up as outlets in Interface Builder, where we connected them to other objects. When our nib file is loaded, these properties will be set to reference the objects they're connected to.
Objective-C uses reference counting for memory management. The weak attribute on our properties mean that they are weak references, that is, they don't contribute to the reference count of the objects they refer to. Strong references would increment the reference count in the property's setter.
After the class extension, we begin the method definitions:
@implementation AppDelegate

- (id)init {
    self = [super init];
    if (self) {
        [self newGame:nil];
    }
    return self;
}

- (BOOL)applicationShouldTerminateAfterLastWindowClosed:(NSApplication*)app {
    (void)app;
    return YES;
}
The syntax of a method definition matches that of a method declaration (prefixed by + or - followed by return type in parenthesis, etc), except that it includes the method body surrounded by curly braces.
The init method initializes our object. It is important to call the initializer of the superclass first (and abort if that returns nil). [super init] is a message expression. It sends an init message to the super object (super refers to the instance of our object's parent class). The message terminology comes from Smalltalk, and is similar to a method invocation in other languages. If initialization of the parent succeeded, we initialize ourselves with the newGame: method, by sending a message to ourselves (self is similar to this in Java and C++).
The applicationShouldTerminateAfterLastWindowClosed: method is part of the NSApplicationDelegate protocol which our class conforms to. It gets called by NSApplication to ask if we would like the application to terminate after the last window closed, to which the answer is yes. (YES and NO, of type BOOL correspond to true and false in other languages.) The app argument is cast to void to suppress compiler warnings about unused variables.
The following method definitions are straight-forward, mixing regular C code with a few message expressions:
- (const othello_t*)board {
    return &board;
}

- (enum State)state {
    return state;
}

- (void)boardWasClickedAtRow:(int)row Column:(int)col {
    if (state == BLACKS_MOVE) {
        [self makeMoveAtRow:row Column:col];
    }
}

- (IBAction)newGame:(id)sender {
    (void)sender;
    othello_init(&board);
    state = BLACKS_MOVE;
    [self.newgameMenu setEnabled:YES];
    [self.othelloView setNeedsDisplay:YES];
}
Note the self.othelloView syntax which is shorthand for accessing a property. It is equivalent to invoking the getter method with [self othelloView], but cuts down on the use of angle brackets.
makeMoveAtRow:Column:, the final method, is similar to make_move in the Windows and X11 versions, making a move for the current player and transitioning to the next game state:
- (void)makeMoveAtRow:(int)row Column:(int)col {
    assert(state == BLACKS_MOVE || state == WHITES_MOVE);

    if (state == BLACKS_MOVE) {
        if (!othello_is_valid_move(&board, PLAYER_BLACK, row, col)) {
            // Illegal move; ignored.
            return;
        }

        othello_make_move(&board, PLAYER_BLACK, row, col);
        state = WHITES_MOVE;
    } else {
        othello_make_move(&board, PLAYER_WHITE, row, col);
        state = BLACKS_MOVE;
    }

    if (!othello_has_valid_move(&board, PLAYER_BLACK) &&
        !othello_has_valid_move(&board, PLAYER_WHITE)) {
        state = GAME_OVER;
    } else if (state == BLACKS_MOVE &&
               !othello_has_valid_move(&board, PLAYER_BLACK)) {
        state = WHITES_MOVE;
    } else if (state == WHITES_MOVE &&
               !othello_has_valid_move(&board, PLAYER_WHITE)) {
        state = BLACKS_MOVE;
    }

    if (state == WHITES_MOVE) {
        dispatch_async(dispatch_get_global_queue(
                    DISPATCH_QUEUE_PRIORITY_DEFAULT, 0), ^{
            int row, col;
            othello_compute_move(&board, PLAYER_WHITE, &row, &col);

            dispatch_async(dispatch_get_main_queue(), ^{
                [self makeMoveAtRow:row Column:col];
            });
        });
    }

    [self.newgameMenu setEnabled:(state != WHITES_MOVE)];
    [self.othelloView setNeedsDisplay:YES];
}

@end
As in the other versions, it is important that othello_compute_move is called on a background thread. To accomplish this, we use dispatch_async which takes a dispatch queue argument (dispatch_get_global_queue(DISPATCH_QUEUE_PRIORITY_DEFAULT, 0) gets us a background thread) and an Objective-C block, a form of anonymous function created with the ^{ ... } syntax. After the move is computed, we use the same technique to call back to makeMoveAtRow:Column: with the result.
Similarly to the Windows version, we need to be careful not to change the game state on the main thread while a move is being computed on another thread. For that reason, we disable the "New Game" menu item while it's white's turn.
The View
The OthelloView class is responsible for displaying the game state and letting the AppDelegate know when the user clicks on or selects a cell using the keyboard.
The class declaration, in OthelloView.h is very simple:
#import <Cocoa/Cocoa.h>

@interface OthelloView : NSView {
    int selCol, selRow;
    int cellSize, xOffset, yOffset, size;
}
@end
All it does is declare a few instance variables to keep track of which cell is currently selected, and the position that the board is drawn at. It doesn't declare any methods in addition to those it inherits from NSView.
As with AppDelegate, we use a class extension to declare a few private methods and a property which we connected in Interface Builder. In OthelloView.m:
#import "OthelloView.h"
#import "AppDelegate.h"
#include "../othello.h"

@interface OthelloView ()
- (void)drawChar:(char)c atPoint:(NSPoint)p;
- (void)drawString:(NSString*)s atPoint:(NSPoint)p;
- (BOOL)hitTest:(NSPoint)p withHitRow:(int*)row hitCol:(int*)col;

@property (weak) IBOutlet AppDelegate *delegate;
@end

static const int CELL_GAP = 1;
The delegate property will be used to get the game state, and for sending notifications when the user clicks a cell.
First we define a few methods inherited from NSView:
@implementation OthelloView

- (void)awakeFromNib {
    [super awakeFromNib];

    selRow = -1;
    selCol = -1;

    [self.window setAcceptsMouseMovedEvents:YES];
    [self setNeedsDisplay:YES];
}

- (BOOL)acceptsFirstResponder {
    return YES;
}

- (BOOL)isFlipped {
    return YES;
}
awakeFromNib gets called after our object is loaded from the nib file. We initialize the selected cell variables, let the window (NSView has a window getter) know that we would like to receive mouse-motion events, and then call setNeedsDisplay: to let the framework know that we'd like to be painted.
Returning YES from acceptsFirstResponder allows our view to receive keyboard events.
Returning YES from isFlipped means our view will draw in a "flipped" coordinate system, that is, the origin will be in the upper-left corner instead of the default which is lower-left. This is useful because it gives us the same coordinate system that we used for X11 and Windows, so we can reuse our calculations in the drawing code.
The drawing is performed by drawRect: which gets called when the framework wants to draw the view:
- (void)drawRect:(NSRect)dirtyRect {
    [super drawRect:dirtyRect];

    // Compute size and position of the 10x10 grid.
    NSRect bounds = [self bounds];
    float viewSize = MIN(bounds.size.height, bounds.size.width);
    cellSize = (viewSize - 9 * CELL_GAP) / 10;
    size = cellSize * 10 + 9 * CELL_GAP;
    xOffset = bounds.origin.x + bounds.size.width / 2 - size / 2;
    yOffset = bounds.origin.y + bounds.size.height / 2 - size / 2;

    // Draw a background square around the 8x8 centre cells.
    [[NSColor blackColor] set];
    NSRect backgroundRect =
        NSMakeRect(xOffset + cellSize, yOffset + cellSize,
                   8 * cellSize + 9 * CELL_GAP, 8 * cellSize + 9 * CELL_GAP);
    [NSBezierPath fillRect:backgroundRect];

    // Draw labels.
    for (int row = 0; row < 8; row++) {
        float x = xOffset + cellSize / 2;
        float y = yOffset + (row + 1) * (cellSize + CELL_GAP) + cellSize / 2;
        [self drawChar:('1' + row) atPoint:NSMakePoint(x, y)];
    }
    for (int col = 0; col < 8; col++) {
        float x = xOffset + (col + 1) * (cellSize + CELL_GAP) + cellSize / 2;
        float y = yOffset + cellSize / 2;
        [self drawChar:('A' + col) atPoint:NSMakePoint(x, y)];
    }

    const othello_t *board = [self.delegate board];

    // Draw status text.
    NSString *statusText;
    switch ([self.delegate state]) {
    case BLACKS_MOVE:
        statusText = @"Human's move.";
        break;
    case WHITES_MOVE:
        statusText = @"Computer's move...";
        break;
    case GAME_OVER: {
        int blackScore = othello_score(board, PLAYER_BLACK);
        int whiteScore = othello_score(board, PLAYER_WHITE);
        if (blackScore > whiteScore) {
            statusText = [NSString stringWithFormat:@"Human wins %d-%d!",
                                   blackScore, whiteScore];
        } else if (whiteScore > blackScore) {
            statusText = [NSString stringWithFormat:@"Computer wins %d-%d!",
                                   whiteScore, blackScore];
        } else {
            statusText = @"Draw!";
        }
        break;
        }
    }
    [self drawString:statusText atPoint:NSMakePoint(xOffset + size / 2,
            yOffset + size - cellSize / 2)];

    // Draw the cells.
    NSColor *boardColor =
        [NSColor colorWithCalibratedRed:0 green:(0x80 / 256.0) blue:0 alpha:1];
    NSColor *highlightColor =
        [NSColor colorWithCalibratedRed:0 green:(0xAA / 256.0) blue:0 alpha:1];

    for (int row = 0; row < 8; row++) {
        for (int col = 0; col < 8; col++) {
            float x = xOffset + (col + 1) * (cellSize + CELL_GAP);
            float y = yOffset + (row + 1) * (cellSize + CELL_GAP);
            bool highlight = (row == selRow && col == selCol &&
                              [self.delegate state] == BLACKS_MOVE);

            // Draw the cell background.
            [(highlight ? highlightColor : boardColor) set];
            NSRect cellRect = NSMakeRect(x, y, cellSize, cellSize);
            [NSBezierPath fillRect:cellRect];

            // Draw the disk, if any.
            NSBezierPath *diskPath =
                [NSBezierPath bezierPathWithOvalInRect:cellRect];
            switch (othello_cell_state(board, row, col)) {
            case CELL_BLACK:
                [[NSColor blackColor] set];
                [diskPath fill];
                break;
            case CELL_WHITE:
                [[NSColor whiteColor] set];
                [diskPath fill];
                break;
            default:
                break;
            }
        }
    }
}
The drawing strategy is exactly the same as for X11 and Windows: the drawing area is divided into a square 10-by-10 grid, of which the centre 8-by-8 cells are the othello board, the top and left columns are used for labels, and the bottom row for status text.
When drawing the status text we use the @"foo" syntax, which is a shorthand for creating NSString objects, the string class used in Objective-C.
These are the auxiliary methods used for drawing characters and strings:
- (void)drawChar:(char)c atPoint:(NSPoint)p {
    const char s[] = {c, 0};
    [self drawString:[NSString stringWithUTF8String:s] atPoint:p];
}

- (void)drawString:(NSString*)s atPoint:(NSPoint)p {
    NSFont *font = [NSFont boldSystemFontOfSize:[NSFont systemFontSize]];
    NSAttributedString *as = [[NSAttributedString alloc]
        initWithString:s attributes:@{ NSFontAttributeName: font }];
    NSSize stringSize = [as size];
    [as drawAtPoint:NSMakePoint(p.x - stringSize.width / 2,
                                p.y - stringSize.height / 2)];
}
The @{ ... } expression is a dictionary literal, shorthand for creating an immutable NSDictionary.
Traditionally, Objective-C programmers had to deal with managing the reference counts of objects allocated on the heap. Manually allocated or copied objects (such as the NSAttributedString above) would have to be dealt with manually, whereas objects created by the framework (for example, the NSFont) would be added automatically to an autorelease pool and released on the next iteration of the event loop. See the documentation about memory management. More recently, a system called Automatic Reference Counting (ARC) was introduced, which makes the compiler insert the necessary code for retaining and releasing objects, so for example we don't worry about the reference count on the NSAttributedString even though we allocated it manually.
Handling mouse events is similar to the other ports as well: we perform a hit test to check if the mouse is over a cell on the Othello board, update the selected cell so it is drawn highlighted, and notify the delegate if a cell is clicked:
- (void)mouseDown:(NSEvent*)event {
    int row, col;
    if ([self hitTest:[event locationInWindow] withHitRow:&row hitCol:&col]) {
        [self.delegate boardWasClickedAtRow:row Column:col];
    }
}

- (void)mouseMoved:(NSEvent*)event {
    int row, col;
    if (![self hitTest:[event locationInWindow] withHitRow:&row hitCol:&col]) {
        row = -1;
        col = -1;
    }
    if (row != selRow || col != selCol) {
        selRow = row;
        selCol = col;
        [self setNeedsDisplay:YES];
    }
}

- (BOOL)hitTest:(NSPoint)p withHitRow:(int*)row hitCol:(int*)col {
    p = [self convertPoint:p fromView:nil];
    *row = (int)(p.y - yOffset) / (cellSize + CELL_GAP) - 1;
    *col = (int)(p.x - xOffset) / (cellSize + CELL_GAP) - 1;
    if (*row >= 0 && *row < 8 && *col >= 0 && *col < 8) {
        return YES;
    }

    return NO;
}
Note that because our view uses the "flipped" coordinate system, we have to convert the coordinates from the event to our own coordinate system when performing the hit test.
Finally, we also handle keyboard events to select a cell or make a move:
- (void)keyDown:(NSEvent*)event {
    int row = selRow;
    int col = selCol;
    unichar c = [[event charactersIgnoringModifiers] characterAtIndex:0];

    switch (c) {
    default:
        return;

    case ' ':
    case NSCarriageReturnCharacter:
        if (selRow >= 0) {
            [self.delegate boardWasClickedAtRow:selRow Column:selCol];
        }
        return;

    case NSRightArrowFunctionKey: col++; break;
    case NSLeftArrowFunctionKey:  col--; break;
    case NSDownArrowFunctionKey:  row++; break;
    case NSUpArrowFunctionKey:    row--; break;

    case 'a': case 'b': case 'c': case 'd':
    case 'e': case 'f': case 'g': case 'h':
        col = c - 'a';
        break;

    case '1': case '2': case '3': case '4':
    case '5': case '6': case '7': case '8':
        row = c - '1';
        break;
    }

    selRow = MAX(0, MIN(row, 7));
    selCol = MAX(0, MIN(col, 7));
    [self setNeedsDisplay:YES];
}

@end
Building
The program can of course be built from the Xcode IDE, but Xcode also provides a way to build the project from the command line:
$ xcodebuild -project Othello.xcodeproj -configuration Release
From the output of that, we can learn how to build the program ourselves. First we create the output folder:
$ mkdir -p Othello.app/Contents/MacOS Othello.app/Contents/Resources
Then we build the executable. We just have to invoke Clang with some extra flags to link against the Cocoa framework, enable ARC, and such:
$ clang -Wextra -O3 -DNDEBUG main.m AppDelegate.m OthelloView.m ../othello.c \
	-mmacosx-version-min=10.7 -fobjc-arc -fobjc-link-runtime \
	-lobjc -framework Cocoa -o Othello.app/Contents/MacOS/Othello
The .xib file is converted to a .nib file using ibtool:
$ ibtool --output-format human-readable-text --errors --warnings --notices \
	--module Othello --target-device mac --minimum-deployment-target 10.7 \
	--compile Othello.app/Contents/Resources/MainMenu.nib MainMenu.xib
We use iconutil to create a .icns file from the mac.iconset dir, which contains PNG images in certain specific sizes:
$ iconutil -c icns -o Othello.app/Contents/Resources/Othello.icns ../icons/mac.iconset
Finally, we copy the information property list into the bundle:
$ cp Info.plist Othello.app/Contents/
The picture below shows the resulting application running on Mac:
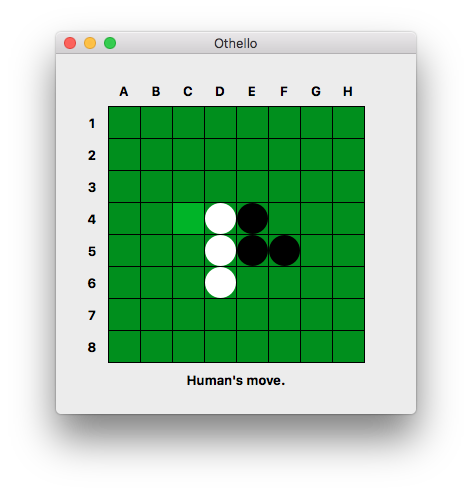
iOS
On 9 January 2007, Apple announced the iPhone and changed the world of mobile computing. Smart-phones already existed, and before that there were pocket computers like Palm Pilot and even Apple's own Newton — but in that presentation in 2007, Steve Jobs showed what smart-phones would look like going forward, both from Apple and from other manufacturers.
The operating system, iOS (originally iPhone OS), is a mobile version of macOS, and applications are developed similarly to the Mac: with Objective-C or Swift using a mobile version of the Cocoa libraries called Cocoa Touch. This similarity between mobile and desktop made it easy for existing Mac developers to start writing apps for the iPhone.
The Othello program for iOS is very similar to the Mac version. It's written in Objective-C and much of the code is virtually identical. I used the fourth edition (the last one using Objective-C) of Keur, Hillegass & Conway "iOS Programming: The Big Nerd Ranch Guide" as a tutorial to iOS programming.
Launch Screen
iOS programs can use nib files for interfaces just as Mac applications do, but in the case of the Othello program, there was no reason to since all we need is a single view that covers the whole screen.
However, iOS introduces a new kind of xml blobs: storyboards. A storyboard is a way of organizing multiple application screens and the transitions between them. The Othello program has no need for that since it uses a single screen, however storyboards can also be used for the application launch screen.
Since it can take a little while to load an application, the operating system displays the application's launch screen while it's loading, similarly to a splash screen. The launch screen is static, and can either be an image file or a storyboard file. Using a static image requires having an image file that matches the resolution of the screen being used, and since there are so many devices running iOS (all the iPhones, iPads, iPod touches, etc.), it requires quite a collection of images. A storyboard solves that problem as it can be configured to scale to any size, and it has therefore become the preferred launch screen method.
Here is LaunchScreen.storyboard for our Othello program (again, apologies for the ugly blob of XML):
<?xml version="1.0" encoding="UTF-8"?>
<document type="com.apple.InterfaceBuilder3.CocoaTouch.Storyboard.XIB" version="3.0"
toolsVersion="11762" systemVersion="16D32" targetRuntime="iOS.CocoaTouch"
propertyAccessControl="none" useAutolayout="YES" launchScreen="YES"
useTraitCollections="YES" colorMatched="YES" initialViewController="01J-lp-oVM">
  <device id="retina4_7" orientation="portrait">
    <adaptation id="fullscreen"/>
  </device>
  <dependencies>
    <plugIn identifier="com.apple.InterfaceBuilder.IBCocoaTouchPlugin" version="11757"/>
    <capability name="documents saved in the Xcode 8 format" minToolsVersion="8.0"/>
  </dependencies>
  <scenes>
    <!--View Controller-->
    <scene sceneID="EHf-IW-A2E">
      <objects>
        <viewController id="01J-lp-oVM" sceneMemberID="viewController">
          <layoutGuides>
            <viewControllerLayoutGuide type="top" id="Llm-lL-Icb"/>
            <viewControllerLayoutGuide type="bottom" id="xb3-aO-Qok"/>
          </layoutGuides>
          <view key="view" contentMode="scaleToFill" id="Ze5-6b-2t3">
            <rect key="frame" x="0.0" y="0.0" width="375" height="667"/>
            <autoresizingMask key="autoresizingMask" widthSizable="YES"
            heightSizable="YES"/>
            <subviews>
              <label opaque="NO" userInteractionEnabled="NO" contentMode="left"
              horizontalHuggingPriority="251" verticalHuggingPriority="251"
              text="Othello by hanshq.net" textAlignment="natural"
              lineBreakMode="tailTruncation" baselineAdjustment="alignBaselines"
              adjustsFontSizeToFit="NO" translatesAutoresizingMaskIntoConstraints="NO"
              id="gDH-hN-GzD">
                <rect key="frame" x="103" y="323" width="169" height="21"/>
                <fontDescription key="fontDescription" type="system" pointSize="17"/>
                <nil key="textColor"/>
                <nil key="highlightedColor"/>
              </label>
            </subviews>
            <color key="backgroundColor"
            xcode11CocoaTouchSystemColor="systemBackgroundColor"
            cocoaTouchSystemColor="whiteColor"/>
            <constraints>
              <constraint firstItem="gDH-hN-GzD" firstAttribute="centerY"
              secondItem="Ze5-6b-2t3" secondAttribute="centerY" id="lK5-06-eby"/>
              <constraint firstItem="gDH-hN-GzD" firstAttribute="centerX"
              secondItem="Ze5-6b-2t3" secondAttribute="centerX" id="zhh-XG-Z3H"/>
            </constraints>
          </view>
        </viewController>
        <placeholder placeholderIdentifier="IBFirstResponder" id="iYj-Kq-Ea1"
        userLabel="First Responder" sceneMemberID="firstResponder"/>
      </objects>
      <point key="canvasLocation" x="52" y="374.66266866566718"/>
    </scene>
  </scenes>
</document>
The storyboard was created in Xcode. All it does is display the text "Othello by hanshq.net" centered on the screen.
Main and AppDelegate
The main method looks similar to that of the Mac version, except that we call UIApplicationMain instead of NSApplicationMain. In main.m:
#import <UIKit/UIKit.h>
#import "AppDelegate.h"

int main(int argc, char **argv) {
    @autoreleasepool {
        return UIApplicationMain(argc, argv, nil,
            NSStringFromClass([AppDelegate class]));
    }
}
The UI prefix refers to classes in the UIKit framework, which is the Cocoa Touch version of AppKit that is used on desktop. The classes in the Foundation framework are the same and still have their NS prefix, such as NSString, etc.
One difference from the desktop version is that we need to pass in the name of our application delegate to UIApplicationMain. This is also why the code is put in an autorelese pool block: because of the heap-allocated NSString.
Similarly to the desktop version, the purpose of the AppDelegate is to receive calls from the framework's application class, UIApplication. Those calls are part of the UIApplicationDelegate procol. In addition to that, on iOS the AppDelegate usually owns the main window, and inherits from UIResponder which means it can take part of the responder chain and handle application-level events (the Othello program doesn't make use of this). In AppDelegate.h:
#import <UIKit/UIKit.h>

@interface AppDelegate : UIResponder <UIApplicationDelegate>

@property (strong, nonatomic) UIWindow *window;

@end
In AppDelegate.m, we implement four methods of the UIApplicationDelegate protocol in our AppDelegate class:
#import "AppDelegate.h"
#import "OthelloViewController.h"

@implementation AppDelegate

- (BOOL)application:(UIApplication*)application
        willFinishLaunchingWithOptions:(nullable NSDictionary*)launchOptions {
    self.window =
        [[UIWindow alloc] initWithFrame:[[UIScreen mainScreen] bounds]];
    return YES;
}

- (BOOL)application:(UIApplication*)application
        didFinishLaunchingWithOptions:(NSDictionary*)launchOptions {
    if (!self.window.rootViewController) {
        self.window.rootViewController = [[OthelloViewController alloc] init];
    }

    [self.window makeKeyAndVisible];
    return YES;
}

- (BOOL)application:(UIApplication*)application
        shouldSaveApplicationState:(nonnull NSCoder*)coder {
    return YES;
}

- (BOOL)application:(UIApplication *)application
        shouldRestoreApplicationState:(nonnull NSCoder*)coder {
    return YES;
}

@end
These methods are all concerned with the life-cycle of the application. application:willFinishLaunchingWithOptions: gets called at the beginning of the launch process. It is responsible for setting up the root window of the application.
application:didFinishLaunchingWithOptions: gets called at the end of the launch process, when the program is ready to be displayed. If our view controller (further below) wasn't restored from a previous session, it's created here, and the window is then made visible.
application:shouldSaveApplicationState: and application:shouldRestoreApplicationState: get called to check whether the application state should be saved and restored when the program gets shut down and started. We will deal with this in the view controller below.
The View Controller
In the desktop version I was perhaps a little bit sloppy and used the AppDelegate as controller for everything, rather than having a specific controller class for the OthelloView. On iOS however, each view needs to be managed by a ViewController class. There can be hierarchies of view controllers and views, but in our case it's simple: there will be an OthelloViewController which owns the Othello board and controls the OthelloView that displays it.
This is the class declaration, in OthelloViewController.h:
#import <UIKit/UIKit.h>
#include "../othello.h"

enum State { BLACKS_MOVE, WHITES_MOVE, GAME_OVER };

@interface OthelloViewController
    : UIViewController <UIViewControllerRestoration> {
    othello_t board;
    enum State state;
}

@end
It inherits from UIViewController, and also conforms to the UIViewControllerRestoration protocol, which is used to save and restore the controller's state.
We begin the implementation in OthelloViewController.m by adding a few private methods, and also by adding another protocol that it conforms to: OthelloViewDelegate. This is a protocol defined by the OthelloView, which contains methods (boardWasTappedAtRow:col: and newGame) that the view will invoke when the user taps on a cell or requests a new game.
#import "OthelloViewController.h"
#import "OthelloView.h"

@interface OthelloViewController () <OthelloViewDelegate>
- (void)makeMoveAtRow:(int)row Column:(int)col;
- (void)computeWhiteMove;
@end
The initialization method starts a new game and sets two properties used by UIKit's state preservation mechanism to identify the class:
@implementation OthelloViewController

- (id)init {
    self = [super init];
    if (self) {
        [self newGame];
        self.restorationClass = self.class;
        self.restorationIdentifier = NSStringFromClass(self.class);
    }
    return self;
}
To save our state, we implement the encodeRestorableStateWithCoder: method, by using the NSCoder to encode the Othello board and game state, which the framework then stores somewhere:
- (void)encodeRestorableStateWithCoder:(NSCoder*)coder {
    uint8_t boardBytes[64];
    for (int row = 0; row < 8; row++) {
        for (int col = 0; col < 8; col++) {
            boardBytes[row * 8 + col] = othello_cell_state(&board, row, col);
        }
    }
    [coder encodeBytes:boardBytes length:sizeof(boardBytes) forKey:@"board"];
    [coder encodeInt:(int)state forKey:@"state"];

    [super encodeRestorableStateWithCoder:coder];
}
For state restoration, we implement the class method (note the + prefix) viewControllerWithRestorationIdentifierPath:coder: which creates an instance of our class and installs it as the root controller, and decodeRestorableStateWithCoder: which deserializes the Othello board and game state from an NSCoder:
+ (UIViewController*)
viewControllerWithRestorationIdentifierPath:(NSArray*)identifierComponents
                                      coder:(NSCoder*)coder {
    OthelloViewController *ovc = [[self alloc] init];
    [UIApplication sharedApplication].delegate.window.rootViewController = ovc;

    return ovc;
}

- (void)decodeRestorableStateWithCoder:(NSCoder*)coder {
    NSUInteger length;
    const uint8_t *boardBytes = [coder decodeBytesForKey:@"board"
            returnedLength:&length];
    if (length != 64) {
        return;
    }
    for (int row = 0; row < 8; row++) {
        for (int col = 0; col < 8; col++) {
            othello_set_cell_state(&board, row, col, boardBytes[row * 8 + col]);
        }
    }

    state = [coder decodeIntForKey:@"state"];

    [super decodeRestorableStateWithCoder:coder];

    if (state == WHITES_MOVE) {
        [self computeWhiteMove];
    }
}
loadView gets called by the framework when it wants to paint the view, but no view has been loaded yet:
- (void)loadView {
    self.view = [[OthelloView alloc] initWithBoard:&board state:state
        delegate:self];
}
We implement the two functions that the view can invoke:
- (void)boardWasTappedAtRow:(int)row col:(int)col {
    if (state == BLACKS_MOVE) {
        [self makeMoveAtRow:row Column:col];
    }
}

- (void)newGame {
    state = BLACKS_MOVE;
    othello_init(&board);
    [(OthelloView*)self.view updateWithState:state];
}
And the code to update the state and compute new moves, which is basically the same as for the Mac version:
- (void)makeMoveAtRow:(int)row Column:(int)col {
    assert(state == BLACKS_MOVE || state == WHITES_MOVE);

    if (state == BLACKS_MOVE) {
        if (!othello_is_valid_move(&board, PLAYER_BLACK, row, col)) {
            // Illegal move; ignored.
            return;
        }

        othello_make_move(&board, PLAYER_BLACK, row, col);
        state = WHITES_MOVE;
    } else {
        othello_make_move(&board, PLAYER_WHITE, row, col);
        state = BLACKS_MOVE;
    }

    if (!othello_has_valid_move(&board, PLAYER_BLACK) &&
        !othello_has_valid_move(&board, PLAYER_WHITE)) {
        state = GAME_OVER;
    } else if (state == BLACKS_MOVE &&
               !othello_has_valid_move(&board, PLAYER_BLACK)) {
        state = WHITES_MOVE;
    } else if (state == WHITES_MOVE &&
               !othello_has_valid_move(&board, PLAYER_WHITE)) {
        state = BLACKS_MOVE;
    }

    if (state == WHITES_MOVE) {
        [self computeWhiteMove];
    }

    [(OthelloView *)self.view updateWithState:state];
}

- (void)computeWhiteMove {
    assert(state == WHITES_MOVE);

    dispatch_async(
        dispatch_get_global_queue(DISPATCH_QUEUE_PRIORITY_DEFAULT, 0),
        ^(void) {
          int row, col;
          othello_compute_move(&board, PLAYER_WHITE, &row, &col);

          dispatch_async(dispatch_get_main_queue(), ^(void) {
            [self makeMoveAtRow:row Column:col];
          });
        });
}

@end
The View
The iOS OthelloView is very similar to the Mac version: the drawing strategy is the same, and the APIs are almost identical. Instead of mouse events, it handles touch events, and it doesn't deal with keyboard events, which means there is no code for highlighting cells.
The declaration in OthelloView.h:
#import <UIKit/UIKit.h>
#import "OthelloViewController.h"
#include "../othello.h"

@protocol OthelloViewDelegate <NSObject>
- (void)boardWasTappedAtRow:(int)row col:(int)col;
- (void)newGame;
@end

@interface OthelloView : UIView {
    const othello_t *board;
    enum State state;
    __weak id<OthelloViewDelegate> delegate;
    int cellSize, xOffset, yOffset, size;
}

- (id)initWithBoard:(const othello_t*)b state:(enum State)s
           delegate:(id<OthelloViewDelegate>)d;

- (void)updateWithState:(enum State)state;

@end
On the Mac, we connected OthelloView explicitly to the AppDelegate, the controller, to notify it of user actions, etc. For the iOS version, we instead define the OthelloViewDelegate protocol. The view gets initialized with a reference to a class conforming to the protocol, and beyond that it doesn't need to know what class it's talking to. This makes the view a bit more independent.
Note also that the iOS view receives updates via its updateWithState: method whenever the game state changes. That way it doesn't need to "poll" the controller to ask about the state each time it needs to draw something. It's a little unfortunate that the game state is now kept in two places, but this seems nicer overall.
The __weak attribute on the delegate instance variable is necessary to indicate that the view doesn't take ownership of the delegate; it expects someone else to own it. (In this case it avoids a reference cycle between the view controller and the view.) The id<Foo> syntax means it's a reference to a class (id means any class) that conforms to the Foo protocol.
We begin the implementation by defining a few private methods. In OthelloView.m:
#import "OthelloView.h"
#include "../othello.h"

@interface OthelloView ()
- (void)onTap:(UIGestureRecognizer*)gr;
- (void)onLongPress:(UIGestureRecognizer*)gr;
- (void)showMenuAtPoint:(CGPoint)p;
- (void)onNewGameMenu:(id)sender;
- (void)drawChar:(char)c atPoint:(CGPoint)p;
- (void)drawString:(NSString*)s atPoint:(CGPoint)p;
- (BOOL)hitTest:(CGPoint)p withHitRow:(int*)row hitCol:(int*)col;
@end
In the initialization method, we set up two tap gesture recognizers: one that invokes onTap: for regular taps, and one that invokes onLongPress:. We also say yes to becoming first responder, which is necessary for showing a menu, which we'll do later.
(There is no need for isFlipped that we implemented on the Mac version. On iOS, the coordinate system has its origin in the upper-left corner, just as our application likes it.)
@implementation OthelloView

- (id)initWithBoard:(const othello_t*)b state:(enum State)s
           delegate:(id<OthelloViewDelegate>)d {
    self = [super init];
    if (self) {
        board = b;
        state = s;
        delegate = d;

        if (@available(iOS 13.0, *)) {
            [self setBackgroundColor:[UIColor systemBackgroundColor]];
        } else {
            [self setBackgroundColor:[UIColor whiteColor]];
        }

        UITapGestureRecognizer *tr = [[UITapGestureRecognizer alloc]
            initWithTarget:self action:@selector(onTap:)];
        tr.numberOfTapsRequired = 1;
        [self addGestureRecognizer:tr];

        UILongPressGestureRecognizer *lr = [[UILongPressGestureRecognizer alloc]
            initWithTarget:self action:@selector(onLongPress:)];
        [self addGestureRecognizer:lr];
    }
    return self;
}

- (BOOL)canBecomeFirstResponder {
    return YES;
}
(@selector is used to get a reference to a method, like getting a pointer to member function in C++.)
When the user taps the view, we perform hit testing and notify the delegate if an Othello cell was tapped. For long taps (or any taps in the game over state) we bring up a menu to allow the user to start a new game:
- (void)onTap:(UIGestureRecognizer*)gr {
    if (gr.state != UIGestureRecognizerStateEnded) {
        return;
    }
    CGPoint p = [gr locationInView:self];

    // Close the menu if it's currently open.
    UIMenuController *menu = [UIMenuController sharedMenuController];
    if ([menu isMenuVisible]) {
        [menu setMenuVisible:NO animated:YES];
        [self setNeedsDisplay];
        return;
    }

    // In the game over state, bring up the menu for any kind of tap.
    if (state == GAME_OVER) {
        [self showMenuAtPoint:p];
        return;
    }

    int row, col;
    if ([self hitTest:p withHitRow:&row hitCol:&col]) {
        [delegate boardWasTappedAtRow:row col:col];
    }
}

- (void)onLongPress:(UIGestureRecognizer*)gr {
    if (gr.state != UIGestureRecognizerStateBegan || state == WHITES_MOVE) {
        return;
    }

    [self showMenuAtPoint:[gr locationInView:self]];
}

- (void)showMenuAtPoint:(CGPoint)p {
    [self becomeFirstResponder];
    UIMenuController *menu = [UIMenuController sharedMenuController];
    UIMenuItem *newGameItem =
            [[UIMenuItem alloc] initWithTitle:@"New Game"
                                       action:@selector(onNewGameMenu:)];
    menu.menuItems = @[ newGameItem ];
    [menu setTargetRect:CGRectMake(p.x, p.y, 2, 2) inView:self];
    [menu setMenuVisible:YES animated:YES];

    [self setNeedsDisplay];
}

- (void)onNewGameMenu:(id)sender {
    assert(state != WHITES_MOVE);
    [delegate newGame];
}
(The @[ foo ] syntax is short-hand for creating an NSArray.)
When we're notified that the game state has changed, we note the new state and request re-drawing:
- (void)updateWithState:(enum State)s {
    state = s;
    [self setNeedsDisplay];
}
That drawing is done by the code below which, as well as the hit testing, is the same as in the Mac version except for a few names being slightly different:
static const int CELL_GAP = 1;

- (void)drawRect:(CGRect)rect {
    // Compute size and position of the 10x10 grid.
    CGRect bounds = [self bounds];
    float viewSize = MIN(bounds.size.height, bounds.size.width);
    cellSize = (viewSize - 9 * CELL_GAP) / 10;
    size = cellSize * 10 + 9 * CELL_GAP;
    xOffset = bounds.origin.x + bounds.size.width / 2 - size / 2;
    yOffset = bounds.origin.y + bounds.size.height / 2 - size / 2;

    // Draw a background square around the 8x8 cells.
    [[UIColor blackColor] set];
    CGRect backgroundRect =
        CGRectMake(xOffset + cellSize, yOffset + cellSize,
                   8 * cellSize + 9 * CELL_GAP, 8 * cellSize + 9 * CELL_GAP);
    [[UIBezierPath bezierPathWithRect:backgroundRect] fill];

    // Draw labels.
    for (int row = 0; row < 8; row++) {
        float x = xOffset + cellSize / 2;
        float y = yOffset + (row + 1) * (cellSize + CELL_GAP) + cellSize / 2;
        [self drawChar:('1' + row) atPoint:CGPointMake(x, y)];
    }
    for (int col = 0; col < 8; col++) {
        float x = xOffset + (col + 1) * (cellSize + CELL_GAP) + cellSize / 2;
        float y = yOffset + cellSize / 2;
        [self drawChar:('A' + col) atPoint:CGPointMake(x, y)];
    }

    // Draw status text.
    NSString *statusText;
    switch (state) {
    case BLACKS_MOVE:
        statusText = @"Human's move.";
        break;
    case WHITES_MOVE:
        statusText = @"Computer's move...";
        break;
    case GAME_OVER: {
        int blackScore = othello_score(board, PLAYER_BLACK);
        int whiteScore = othello_score(board, PLAYER_WHITE);
        if (blackScore > whiteScore) {
            statusText = [NSString stringWithFormat:@"Human wins %d-%d!",
                                                    blackScore, whiteScore];
        } else if (whiteScore > blackScore) {
            statusText = [NSString stringWithFormat:@"Computer wins %d-%d!",
                                                    whiteScore, blackScore];
        } else {
            statusText = @"Draw!";
        }
        break;
        }
    }
    [self drawString:statusText atPoint:CGPointMake(xOffset + size / 2,
            yOffset + size - cellSize / 2)];

    // Draw the cells.
    UIColor *boardColor =
        [UIColor colorWithRed:0 green:(0x80 / 256.0) blue:0 alpha:1.0];
    for (int row = 0; row < 8; row++) {
        for (int col = 0; col < 8; col++) {
            float x = xOffset + (col + 1) * (cellSize + CELL_GAP);
            float y = yOffset + (row + 1) * (cellSize + CELL_GAP);

            // Draw the cell background.
            [boardColor set];
            CGRect cellRect = CGRectMake(x, y, cellSize, cellSize);
            [[UIBezierPath bezierPathWithRect:cellRect] fill];

            // Draw the disk, if any.
            UIBezierPath *diskPath =
                [UIBezierPath bezierPathWithOvalInRect:cellRect];
            switch (othello_cell_state(board, row, col)) {
            case CELL_BLACK:
                [[UIColor blackColor] set];
                [diskPath fill];
                break;
            case CELL_WHITE:
                [[UIColor whiteColor] set];
                [diskPath fill];
                break;
            default:
                break;
            }
        }
    }
}

- (void)drawChar:(char)c atPoint:(CGPoint)p {
    const char s[] = {c, 0};
    [self drawString:[NSString stringWithUTF8String:s] atPoint:p];
}

- (void)drawString:(NSString*)s atPoint:(CGPoint)p {
    UIColor *color = [UIColor blackColor];
    if (@available(iOS 13.0, *)) {
        color = [UIColor labelColor];
    }
    UIFont *font = [UIFont preferredFontForTextStyle:UIFontTextStyleBody];
    NSAttributedString *as = [[NSAttributedString alloc]
        initWithString:s attributes:@{NSFontAttributeName: font,
                                      NSForegroundColorAttributeName: color
        }];
    CGSize stringSize = [as size];
    [as drawAtPoint:CGPointMake(p.x - stringSize.width / 2,
                                p.y - stringSize.height / 2)];
}

- (BOOL)hitTest:(CGPoint)p withHitRow:(int*)row hitCol:(int*)col {
    *row = (int)(p.y - yOffset) / (cellSize + CELL_GAP) - 1;
    *col = (int)(p.x - xOffset) / (cellSize + CELL_GAP) - 1;
    if (*row >= 0 && *row < 8 && *col >= 0 && *col < 8) {
        return YES;
    }

    return NO;
}

@end
Building
The process of building, and in particular dealing with signing and getting applications onto a hardware device, is complicated. It's easy from within Xcode, but although it should of course be technically possible, I haven't figured out how to do it from the command line.
This is what the program looks like on an iPhone SE:
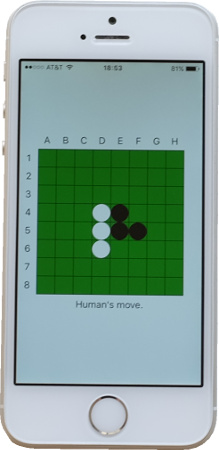
Android
Android is Google's open-source mobile operating system. The first Android phone, the G1, was announced in September 2008. Today, the system is used by most phone manufacturers besides Apple, and has become the most popular operating system on mobile with more than two billion active devices.
Applications on Android are typically written in the Java language using custom libraries, and compiled to bytecode run by a custom virtual machine (originally Dalvik, later ART). This programming model means we have to work a little harder to reuse the C code for our Othello engine.
To learn about Android programming, I read Phillips, Stewart, Hardy & Marsicano "Android Programming: The Big Nerd Ranch Guide" (2nd edition). In the process of figuring things out, I wrote a separate post about building Android apps from the command-line.
Manifest, Resources, and Main Activity
In the app manifest, AndroidManifest.xml shown below, we specify the application name, version, icon, and most importantly the entry point, which in our case is OthelloActivity. We also specify the minimum API version our application targets, which affects what library functions we can use. Since we don't need anything fancy, our app will target API version 16, which according to this dashboard, is supported by 98% of all active Android devices.
<?xml version="1.0" encoding="utf-8"?>
<manifest xmlns:android="http://schemas.android.com/apk/res/android"
          package="net.hanshq.reversi"
          android:versionCode="1"
          android:versionName="1.0">
    <uses-sdk android:minSdkVersion="33"/>
    <application android:label="Reversi" android:icon="@drawable/icon">
        <activity android:name=".OthelloActivity" android:exported="true">
            <intent-filter>
                <action android:name="android.intent.action.MAIN"/>
                <category android:name="android.intent.category.LAUNCHER"/>
            </intent-filter>
        </activity>
    </application>
</manifest>
Besides the icon referred to in the manifest, our application includes a few other resources. Below is menu_othello.xml, which defines the menu (the reverse name seems to be an Android convenition). The @+id syntax in the menu item defines a new resource id, which we will use to refer to that menu item in the code.
<?xml version="1.0" encoding="utf-8"?>
<menu xmlns:android="http://schemas.android.com/apk/res/android">
    <item
        android:id="@+id/menu_item_new_game"
        android:title="New Game"/>
</menu>
We also have a resource file that defines the layout of our main and only screen: activity_othello.xml below. Layouts are usually created in Android Studio, but the format is not too verbose, so I wrote this one by hand. It simply specifies that we'd like an OthelloView to cover the whole layout area with a small margin. As with the menu, we use @+id to create an identifier for the view:
<?xml version="1.0" encoding="utf-8"?>
<LinearLayout
    xmlns:android="http://schemas.android.com/apk/res/android"
    android:layout_width="match_parent"
    android:layout_height="match_parent"
    android:gravity="center"
    android:orientation="vertical"
    android:background="#000000">

    <net.hanshq.othello.OthelloView
        android:id="@+id/othello_view"
        android:layout_width="match_parent"
        android:layout_height="match_parent"
        android:layout_margin="4dp"/>
</LinearLayout>
Android applications are organized around activities, which represent screens with user interfaces. Our Othello application only has a single screen, and it is implemented in OthelloActivity.java below.
We use this class to act as the controller: it owns the model of the game (the state enum, and the OthelloBoard implemented in the next section), updates the game state in response to user actions, and controls the view of the game:
package net.hanshq.othello;

import android.app.Activity;
import android.os.AsyncTask;
import android.os.Bundle;
import android.view.Menu;
import android.view.MenuItem;
import android.widget.TextView;

public class OthelloActivity extends Activity
        implements OthelloView.TouchHandler {
    private static final String BOARD_KEY = "board";
    private static final String STATE_KEY = "state";

    public enum State { BLACKS_MOVE, WHITES_MOVE, GAME_OVER }

    private State mState;
    private OthelloView mView;
    private OthelloBoard mBoard;
    private ComputeWhiteMoveTask mWhiteMoveTask;
When the application starts, we set the view of the screen to the layout defined in the resource file above. The special R class is used to access resources in the application. Our OthelloView (which will be implemented further below) is instantiated by the layout, and we get a reference to it via the R class using the resource id we defined.
As on iOS, it's important to save and restore the game state in case the application gets killed by the operating system while the user is doing something else. On Android, this is done by storing the data in a Bundle.
    @Override
    protected void onCreate(Bundle savedInstanceState) {
        super.onCreate(savedInstanceState);
        setContentView(R.layout.activity_othello);

        mBoard = new OthelloBoard();
        mView = (OthelloView)findViewById(R.id.othello_view);
        mView.setBoard(mBoard);
        mView.setTouchHandler(this);
        newGame();

        if (savedInstanceState != null) {
            byte[] boardBytes = savedInstanceState.getByteArray(BOARD_KEY);
            for (int row = 0; row < 8; row++) {
                for (int col = 0; col < 8; col++) {
                    mBoard.setCellState(row, col, boardBytes[row * 8 + col]);
                }
            }

            mState = State.values()[savedInstanceState.getInt(STATE_KEY)];
            if (mState == State.WHITES_MOVE) {
                computeWhiteMove();
            }

            mView.update(mState);
        }
    }

    @Override
    public void onSaveInstanceState(Bundle savedInstanceState) {
        super.onSaveInstanceState(savedInstanceState);

        byte[] boardBytes = new byte[64];
        for (int row = 0; row < 8; row++) {
            for (int col = 0; col < 8; col++) {
                boardBytes[row * 8 + col] = (byte)mBoard.getCellState(row, col);
            }
        }

        savedInstanceState.putByteArray(BOARD_KEY, boardBytes);
        savedInstanceState.putInt(STATE_KEY, mState.ordinal());
    }
To set up the menu, we override the onCreateOptionsMenu method and install the menu from the resource file above. The system will then call onOptionsItemSelected when a menu item is invoked, and we can check if it's the "new game" menu item by referencing it via the R object:
    @Override
    public boolean onCreateOptionsMenu(Menu menu) {
        getMenuInflater().inflate(R.menu.menu_othello, menu);
        return true;
    }

    @Override
    public boolean onOptionsItemSelected(MenuItem item) {
        switch (item.getItemId()) {
        case R.id.menu_item_new_game:
            if (mState != State.WHITES_MOVE) {
                newGame();
            }
            return true;
        default:
            return super.onOptionsItemSelected(item);
        }
    }
We implement the logic for updating the game state much the same as in the other versions:
    private void newGame() {
        mState = State.BLACKS_MOVE;
        mBoard.reset();
        mView.update(mState);
    }

    @Override
    public void onTouch(int row, int col) {
        if (mState == State.BLACKS_MOVE) {
            makeMove(row, col);
        }
    }

    private void makeMove(int row, int col) {
        assert(mState == State.BLACKS_MOVE || mState == State.WHITES_MOVE);

        if (mState == State.BLACKS_MOVE) {
            if (!mBoard.isValidMove(OthelloBoard.PLAYER_BLACK, row, col)) {
                // Illegal move; ignored.
                return;
            }

            mBoard.makeMove(OthelloBoard.PLAYER_BLACK, row, col);
            mState = State.WHITES_MOVE;
        } else {
            mBoard.makeMove(OthelloBoard.PLAYER_WHITE, row, col);
            mState = State.BLACKS_MOVE;
        }

        if (!mBoard.hasValidMove(OthelloBoard.PLAYER_BLACK) &&
                !mBoard.hasValidMove(OthelloBoard.PLAYER_WHITE)) {
            mState = State.GAME_OVER;
        } else if (mState == State.BLACKS_MOVE &&
                !mBoard.hasValidMove(OthelloBoard.PLAYER_BLACK)) {
            mState = State.WHITES_MOVE;
        } else if (mState == State.WHITES_MOVE &&
                !mBoard.hasValidMove(OthelloBoard.PLAYER_WHITE)) {
            mState = State.BLACKS_MOVE;
        }

        if (mState == State.WHITES_MOVE) {
            computeWhiteMove();
        }

        mView.update(mState);
    }
To compute white's move on a background thread, we use an AsyncTask:
    private class ComputeWhiteMoveTask extends AsyncTask<Void, Void, int[]> {
        @Override
        protected int[] doInBackground(Void... args) {
            return mBoard.computeMove(OthelloBoard.PLAYER_WHITE);
        }
        @Override
        protected void onPostExecute(int[] result) {
            makeMove(result[0], result[1]);
        }
    }

    private void computeWhiteMove() {
        mWhiteMoveTask = new ComputeWhiteMoveTask();
        mWhiteMoveTask.execute();
    }

    @Override
    public void onDestroy() {
        super.onDestroy();
        if (mState == State.WHITES_MOVE) {
            mWhiteMoveTask.cancel(false);
        }
        mBoard.destroy();
    }
}
Accessing the Othello Engine
Since our Othello engine is implemented in C, we need to use the Java Native Interface (JNI) to access it. In essence, this means we will have a class with method declarations marked native, which we implement in C and compile into a shared library. See my other post for more details.
In OthelloBoard.java, we implement a class that "wraps" our Othello engine in an interface we can use from the rest of our Java code:
package net.hanshq.othello;

public class OthelloBoard {
    static { System.loadLibrary("othello"); }

    private long mNativeBoard;
    private native void nativeInit();
    private native void nativeDestroy();

    // These must match the native implementation's values.
    static final int CELL_BLACK = 0;
    static final int CELL_WHITE = 1;
    static final int CELL_EMPTY = 2;
    static final int PLAYER_BLACK = 0;
    static final int PLAYER_WHITE = 1;

    public OthelloBoard() { nativeInit(); }
    public void destroy() { nativeDestroy(); }

    public native void reset();
    public native int getCellState(int row, int col);
    public native void setCellState(int row, int col, int state);
    public native int getScore(int player);
    public native boolean hasValidMove(int player);
    public native boolean isValidMove(int player, int row, int col);
    public native void makeMove(int player, int row, int col);
    public native int[] computeMove(int player);
}
The static initializer block is used to load the library that provides implementations of all the methods marked native. We implement those methods in othello_board.c, starting like this:
#include <assert.h>
#include <inttypes.h>
#include <jni.h>
#include <stdlib.h>

#include "othello.h"

static void set_ptr(JNIEnv *env, jobject obj, othello_t *ptr)
{
        jclass class;
        jfieldID field;

        class = (*env)->GetObjectClass(env, obj);
        field = (*env)->GetFieldID(env, class, "mNativeBoard", "J");
        assert(sizeof(jlong) >= sizeof(intptr_t));
        (*env)->SetLongField(env, obj, field, (jlong)(intptr_t)ptr);
}

static othello_t *get_ptr(JNIEnv *env, jobject obj)
{
        jclass class;
        jfieldID field;

        class = (*env)->GetObjectClass(env, obj);
        field = (*env)->GetFieldID(env, class, "mNativeBoard", "J");
        assert(sizeof(jlong) >= sizeof(intptr_t));
        return (othello_t*)(intptr_t)(*env)->GetLongField(env, obj, field);
}

JNIEXPORT void JNICALL
Java_net_hanshq_othello_OthelloBoard_nativeInit(JNIEnv *env, jobject obj)
{
        othello_t *o;

        o = malloc(sizeof(*o));
        othello_init(o);
        set_ptr(env, obj, o);
}

JNIEXPORT void JNICALL
Java_net_hanshq_othello_OthelloBoard_nativeDestroy(JNIEnv *env, jobject obj)
{
        free(get_ptr(env, obj));
        set_ptr(env, obj, NULL);
}
The JNIEnv pointer provides access to functions for dealing with the Java environment, and we use those to access the mNativeBoard field of the OthelloBoard class. We use that field to store a pointer to the othello_t object. Storing a native pointer in a Java class like this is a common technique for wrapping code.
Using the get_ptr helper method above to access the othello_t pointer, we implement the rest of the native methods by simply forwarding to the Othello functions:
JNIEXPORT void JNICALL
Java_net_hanshq_othello_OthelloBoard_reset(JNIEnv *env, jobject obj)
{
        othello_init(get_ptr(env, obj));
}

JNIEXPORT jint JNICALL
Java_net_hanshq_othello_OthelloBoard_getCellState(JNIEnv *env, jobject obj,
                                                  jint row, jint col){
        return othello_cell_state(get_ptr(env, obj), row, col);
}

JNIEXPORT void JNICALL
Java_net_hanshq_othello_OthelloBoard_setCellState(JNIEnv *env, jobject obj,
                                                  jint row, jint col,
                                                  jint state)
{
        othello_set_cell_state(get_ptr(env, obj), row, col, state);
}

JNIEXPORT jint JNICALL
Java_net_hanshq_othello_OthelloBoard_getScore(JNIEnv *env, jobject obj,
                                              jint player)
{
        return othello_score(get_ptr(env, obj), player);
}

JNIEXPORT jboolean JNICALL
Java_net_hanshq_othello_OthelloBoard_hasValidMove(JNIEnv *env, jobject obj,
                                                  jint player)
{
        return othello_has_valid_move(get_ptr(env, obj), player);
}

JNIEXPORT jboolean JNICALL
Java_net_hanshq_othello_OthelloBoard_isValidMove(JNIEnv *env, jobject obj,
                                                 jint player,
                                                 jint row, jint col)
{
        return othello_is_valid_move(get_ptr(env, obj), player, row, col);
}

JNIEXPORT void JNICALL
Java_net_hanshq_othello_OthelloBoard_makeMove(JNIEnv *env, jobject obj,
                                              jint player, jint row, jint col)
{
        othello_make_move(get_ptr(env, obj), player, row, col);
}

JNIEXPORT jintArray JNICALL
Java_net_hanshq_othello_OthelloBoard_computeMove(JNIEnv *env, jobject obj,
                                                 jint player)
{
        jintArray res;
        int arr[2];

        res = (*env)->NewIntArray(env, 2);
        othello_compute_move(get_ptr(env, obj), player, &arr[0], &arr[1]);
        (*env)->SetIntArrayRegion(env, res, 0, 2, arr);

        return res;
}
The View
We implement the view in OthelloView.java, very similarly to the other ports. It has a reference to the OthelloBoard, receives update calls when the state changes, and when the user taps on a cell we notify a class implementing the TouchHandler interface (it's the OthelloActivity class that implements this, but the view doesn't need to know that).
package net.hanshq.othello;

import android.content.Context;
import android.graphics.Canvas;
import android.graphics.Color;
import android.graphics.Paint;
import android.graphics.Rect;
import android.util.AttributeSet;
import android.view.MotionEvent;
import android.view.View;

public class OthelloView extends View {
    private String mStatus;
    private OthelloBoard mBoard;
    private TouchHandler mTouchHandler;

    private final int CELL_GAP = 2;
    private int cellSize, xOffset, yOffset, size;

    public interface TouchHandler {
        public void onTouch(int row, int col);
    }

    public OthelloView(Context context, AttributeSet attrs) {
        super(context, attrs);
    }

    public void setBoard(OthelloBoard board) {
        mBoard = board;
    }

    public void setTouchHandler(TouchHandler handler) {
        mTouchHandler = handler;
    }

    public void update(OthelloActivity.State state) {
        switch (state) {
        case BLACKS_MOVE:
            mStatus = "Human's move.";
            break;
        case WHITES_MOVE:
            mStatus = "Computer's move...";
            break;
        case GAME_OVER:
            int bs = mBoard.getScore(OthelloBoard.PLAYER_BLACK);
            int ws = mBoard.getScore(OthelloBoard.PLAYER_WHITE);

            if (bs > ws) {
                mStatus = "Human wins " + bs + "-" + ws + "!";
            } else if (ws > bs) {
                mStatus = "Computer wins " + ws + "-" + bs + "!";
            } else {
                mStatus = "Draw!";
            }
        }

        invalidate();
    }

    @Override
    public boolean onTouchEvent(MotionEvent e) {
        if (e.getAction() != MotionEvent.ACTION_DOWN) {
            return false;
        }

        int row = (int)(e.getY() - yOffset) / (cellSize + CELL_GAP) - 1;
        int col = (int)(e.getX() - xOffset) / (cellSize + CELL_GAP) - 1;

        if (row >= 0 && row < 8 && col >= 0 && col < 8) {
            mTouchHandler.onTouch((int)row, (int)col);
        }

        return true;
    }

    @Override
    protected void onDraw(Canvas canvas) {
        // Compute size and position of the 10x10 grid.
        int viewSize = Math.min(canvas.getWidth(), canvas.getHeight());
        cellSize = (viewSize - 9 * CELL_GAP) / 10;
        size = cellSize * 10 + 9 * CELL_GAP;
        xOffset = canvas.getWidth() / 2 - size / 2;
        yOffset = canvas.getHeight() / 2 - size / 2;

        // Draw labels.
        for (int row = 0; row < 8; row++) {
            int x = xOffset + cellSize / 2;
            int y = yOffset + (row + 1) * (cellSize + CELL_GAP) + cellSize / 2;
            drawChar((char)('1' + row), x, y, canvas);
        }
        for (int col = 0; col < 8; col++) {
            int x = xOffset + (col + 1) * (cellSize + CELL_GAP) + cellSize / 2;
            int y = yOffset + cellSize / 2;
            drawChar((char)('A' + col), x, y, canvas);
        }

        // Draw status text.
        drawString(mStatus, xOffset + size / 2, yOffset + size - cellSize / 2,
                canvas);

        // Draw the cells.
        Paint cellPaint = new Paint();
        cellPaint.setColor(Color.rgb(0, 0x80, 0));
        Paint whiteDiskPaint = new Paint();
        whiteDiskPaint.setColor(Color.WHITE);
        Paint blackDiskPaint = new Paint();
        blackDiskPaint.setColor(Color.BLACK);

        Rect cellRect = new Rect(0, 0, cellSize, cellSize);
        for (int row = 0; row < 8; row++) {
            for (int col = 0; col < 8; col++) {
                int x = xOffset + (col + 1) * (cellSize + CELL_GAP);
                int y = yOffset + (row + 1) * (cellSize + CELL_GAP);

                // Draw the cell background.
                cellRect.offsetTo(x, y);
                canvas.drawRect(cellRect, cellPaint);

                // Draw the disk, if any.
                int r = cellSize / 2;
                switch (mBoard.getCellState(row, col)) {
                case OthelloBoard.CELL_BLACK:
                    canvas.drawCircle(x + r, y + r, r, blackDiskPaint);
                    break;
                case OthelloBoard.CELL_WHITE:
                    canvas.drawCircle(x + r, y + r, r, whiteDiskPaint);
                    break;
                }
            }
        }
    }

    private void drawChar(char c, int x, int y, Canvas canvas) {
        drawString(String.valueOf(c), x, y, canvas);
    }

    private void drawString(String s, int x, int y, Canvas c) {
        Paint textPaint = new Paint();
        textPaint.setColor(Color.WHITE);
        textPaint.setTextSize(cellSize / 2);
        textPaint.setTextAlign(Paint.Align.CENTER);
        Rect bounds = new Rect();
        textPaint.getTextBounds(s, 0, s.length(), bounds);
        c.drawText(s, 0, s.length(), x, y + bounds.height() / 2, textPaint);
    }
}
Building
Building Android programs is a little bit involved. Android Studio provides some way to do it, but for those of us who like more control, it's also possible to do by hand. The process is described in Building an Android App from the Command Line. For the Othello program, I've put it in a build script, build.sh.
The picture below shows the program running on a Nexus 5.
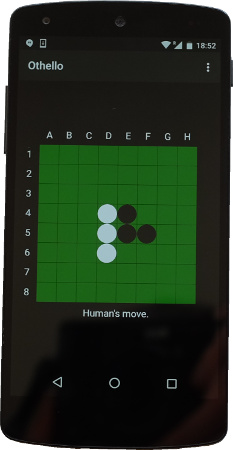
The Web
On 25 December 1990, Tim Berners-Lee, then a contractor at CERN, released a program (written on his NeXT workstation) for displaying, editing, and navigating hyper-text documents across the internet; this was the birth of the world wide web.
A few years later, in 1993, Marc Andreesen and Eric Bina at the University of Illinois Urbana Champaign created Mosaic, the first web browser to become popular. They moved on to start a web browser company in Mountain View, CA, called Netscape. This was the beginning of the dot-com era.
Brendan Eich was hired by Netscape in 1995 to create a scripting language for the browser. The idea was to have a light-weight alternative to Java, which was also being added to the browser at the time. According to legend, Eich created JavaScript in ten days, which perhaps explains some of its quirks.
Java in the browser is now dead, but JavaScript flourishes, and the web has become an extremely powerful way of publishing applications. Early on, it also became popular to embed web content in desktop applications due to the convenience of using HTML for layout. More recently this has been taken to the point where programs are written with web technologies, and then shipped baked into a browser, using for example Electron.
The web version of our Othello game is written in HTML, CSS, and JavaScript, and uses WebAssembly or asm.js for the actual game engine.
(I briefly considered using this as an opportunity to learn about the world of JavaScript frameworks and tools, which I know nothing about. However, in keeping with this post's theme of native development, I ended up writing plain old code by hand except for the asm.js/wasm part.)
I learned about JavaScript from Marijn Haverbeke's excellent Eloquent JavaScript (2nd edition), which is freely available online, and also in print.
Presentation
The Othello game user interface is presented by an HTML document. The board is created with a table element (using border="1" for that classic feel), and a CSS trick is used for the disks:
<!doctype html>
<html>
  <head>
    <title>Othello</title>
    <meta name="viewport" content="width=device-width, initial-scale=1">
    <style>
      body { text-align: center; }
      table {
        margin-left: auto;
        margin-right: auto;
        color-adjust: exact;
        -webkit-print-color-adjust: exact;
      }
      td { background: #008000; }
      td.selected { background: #00AA00; }
      td div {
        width: 30px;
        height: 30px;
        border-radius: 15px;
        background: transparent;  /* Disk colour. */
      }
    </style>
  </head>
  <body>
    <h1>Othello</h1>
    <table border="1"></table>
    <p id="status"><noscript>Error: Javascript required.</noscript></p>
    <button disabled>New Game</button>
    <p>By <a href="http://www.hanshq.net/othello.html">hanshq.net</a>.</p>
    <script src="web_othello.js"></script>
  </body>
</html>
The viewport meta tag makes the page scale to the size of the device, which is important for making the page work on mobile phones and such.
To create round disks, we use CSS to set the style of any div elements in the table (there will be one in each cell) to have rounded corners with a radius half the size of the element. By setting the background color of those elements, we can make black, white, or transparent disks appear in the table. (This might not work if someone decides to print the page, as background colours are not normally printed. The color-adjust property addresses this.)
User Interface Logic
The JavaScript code for the game is split into two parts: one that deals with the user interface, and one that deals with the game engine. The reason is that like in the other versions, we want to compute white's move on a background thread so as not to "hang" the user interface. On the web, this can be accomplished with Web Workers. However, unlike with regular threads, state cannot be shared between web workers and the main execution context, so instead of making black's moves on one thread and white's on another against the same state, we let a web worker manage all the game engine business, and use message passing for communication with the user interface code.
We use the init() function in web_othello.js below to fill the table with elements to represent the board. For each cell on the board, we set event handlers to handle clicks and mouseover events. We also store a reference to each cell in the cells matrix for easy access.
"use strict";

var WAITING = -1, BLACKS_MOVE = 0, WHITES_MOVE = 1, GAME_OVER = 2;
var state = WAITING;
var cells;
var worker;
var selectedRow = -1;
var selectedCol = -1;

function setStatus(text) {
  document.querySelector("#status").innerHTML = text;
}

function setCellListeners(cell, row, col) {
  cell.addEventListener("click", function() { onCellClick(row, col); });
  cell.addEventListener("mousemove", function() { selectCell(row, col); });
  cell.addEventListener("mouseleave", function() { selectCell(-1, -1); });
}

function init() {
  setStatus("Loading...");

  // Fill in the table.
  var table = document.querySelector("table");
  var tr, th, td, div;
  cells = [];

  table.appendChild(tr = document.createElement("tr"));
  tr.appendChild(document.createElement("th"));
  for (var col = 0; col < 8; col++) {
    tr.appendChild(th = document.createElement("th"));
    th.appendChild(document.createTextNode("ABCDEFGH"[col]));
  }

  for (var row = 0; row < 8; row++) {
    cells.push([]);
    table.appendChild(tr = document.createElement("tr"));
    tr.appendChild(th = document.createElement("th"));
    th.appendChild(document.createTextNode(row));

    for (var col = 0; col < 8; col++) {
      tr.appendChild(td = document.createElement("td"));
      td.appendChild(div = document.createElement("div"));
      cells[row][col] = td;
      setCellListeners(td, row, col);
    }
  }

  // Start the worker.
  if (!window.Worker) {
    setStatus("Error: Web Workers not supported.");
    return;
  }
  worker = new Worker("web_othello_worker.js");

  worker.onmessage = function(e) { onMessageReceived(e.data); };
  addEventListener("keydown", onKeyDown);
  document.querySelector("button").addEventListener("click", newGame);
}
We use a simple protocol to communicate between the main context and the worker. The user interface code can send two messages to the worker: either "new game" to reset the game state, or an object with a row and a col property to signal a move by the user. The worker can send three types of messages back to the main context: "loaded" when it's loaded successfully, "error" if it fails to load for some reason, or a message with a state and a board property which fully describe the game state. While waiting for a response from the worker, we enter the WAITING state, in which we don't accept any user input.
function newGame() {
  worker.postMessage("new game");
  state = WAITING;
}

function onMessageReceived(msg) {
  if (msg === "loaded") {
    newGame();
    return;
  }
  if (msg === "error") {
    setStatus("Error :-(");
    return;
  }

  state = msg.state;
  switch(state) {
  case BLACKS_MOVE:
    setStatus("Human's move.");
    break;
  case WHITES_MOVE:
    setStatus("Computer's move..");
    break;
  case GAME_OVER:
    var black = msg.blackScore;
    var white = msg.whiteScore;
    if (black > white) {
      setStatus("Human wins " + black + "–" + white + "!");
    } else if (white > black) {
      setStatus("Computer wins " + white + "–" + black + "!");
    } else {
      setStatus("Draw!");
    }
    break;
  }

  document.querySelector("button").disabled =
    !(state == BLACKS_MOVE || state == GAME_OVER);

  updateDisks(msg.board);
  selectCell(selectedRow, selectedCol);
}

function updateDisks(board) {
  var CELL_BLACK = 0;
  var CELL_WHITE = 1;
  var CELL_EMPTY = 2;

  for (var row = 0; row < 8; row++) {
    for (var col = 0; col < 8; col++) {
      var disk = cells[row][col].firstElementChild;
      switch (board[row][col]) {
      case CELL_BLACK:
        disk.style.background = "black";
        break;
      case CELL_WHITE:
        disk.style.background = "white";
        break;
      case CELL_EMPTY:
        disk.style.background = "transparent";
        break;
      }
    }
  }
}

function selectCell(row, col) {
  if (selectedRow >= 0 && selectedCol >= 0) {
    cells[selectedRow][selectedCol].className = "";
  }

  if (row >= 0 && col >= 0 && state == BLACKS_MOVE) {
    cells[row][col].className = "selected";
  }

  selectedRow = row;
  selectedCol = col;
}

function onCellClick(row, col) {
  if (state != BLACKS_MOVE) {
    return;
  }

  worker.postMessage({row: row, col: col});
  state = WAITING;
}
Like the other desktop versions, we want the user to be able to play the game from the keyboard. This is a little bit tricky, because not all browsers implement the KeyBoardEvent.key property the same. For example, Internet Explorer 11 doesn't support the arrow keys or space with the code below. But I think it's good enough for a best effort approach.
function onKeyDown(e) {
  if (state != BLACKS_MOVE ||
      document.activeElement == document.querySelector("button")) {
    return;
  }

  var row = selectedRow;
  var col = selectedCol;

  switch (e.key) {
  case " ":
  case "Enter":
    if (row >= 0 && col >= 0) {
      onCellClick(selectedRow, selectedCol);
    }
    return;

  case "ArrowRight": col++; break;
  case "ArrowLeft":  col--; break;
  case "ArrowDown":  row++; break;
  case "ArrowUp":    row--; break;

  case "a": case "b": case "c": case "d":
  case "e": case "f": case "g": case "h":
    col = e.key.charCodeAt(0) - "a".charCodeAt(0);
    break;

  case "0": case "1": case "2": case "3":
  case "4": case "5": case "6": case "7":
    row = e.key.charCodeAt(0) - "0".charCodeAt(0);
    break;

  default:
    return;
  }

  selectCell(Math.max(0, Math.min(row, 7)), Math.max(0, Math.min(col, 7)));
}
When the script has loaded and defined all these functions, we call init():
init();
Worker Code
Emscripten is an open-source tool, version 1.0 released in 2011 by Alon Zakai at Mozilla, which compiles C and C++ code (via LLVM IR) to JavaScript. The code it generates is a subset known as asm.js, which means it can be run by any browser that supports JavaScript, and optimized particularly well by browsers that are aware of that subset. More recently, Emscripten can also output code in WebAssembly (or wasm), which is an efficient bytecode representation that's starting to get support in the major browsers this year.
What Emscripten gives us is a Module object with functions such as ccall which allows us to call a compiled C function from JavaScript. We construct a JavaScript class called Board that wraps our Othello game engine by accessing it through the Emscripten Module. In web_othello_worker.js:
"use strict";

var Module;

var SIZEOF_BOARD_T = 16;
var SIZEOF_INT = 4;
var PLAYER_BLACK = 0;
var PLAYER_WHITE = 1;

function Board() {
  this.ptr = Module._malloc(SIZEOF_BOARD_T);
  this.outRow = Module._malloc(SIZEOF_INT);
  this.outCol = Module._malloc(SIZEOF_INT);
  this.init();
}
Board.prototype.init = function() {
  Module.ccall("othello_init", null,
               ["number"],
               [this.ptr]);
};
Board.prototype.cellState = function(row, col) {
  return Module.ccall("othello_cell_state", "number",
                      ["number", "number", "number"],
                      [this.ptr, row, col]);
};
Board.prototype.score = function(player) {
  return Module.ccall("othello_score", "number",
                      ["number", "number"],
                      [this.ptr, player]);
};
Board.prototype.hasValidMove = function(player) {
  return Module.ccall("othello_has_valid_move", "number",
                      ["number", "number"],
                      [this.ptr, player]);
};
Board.prototype.isValidMove = function(player, row, col) {
  return Module.ccall("othello_is_valid_move", "number",
                      ["number", "number", "number", "number"],
                      [this.ptr, player, row, col]);
};
Board.prototype.makeMove = function(player, row, col) {
  Module.ccall("othello_make_move", null,
               ["number", "number", "number", "number"],
               [this.ptr, player, row, col]);
};
Board.prototype.computeMove = function(player) {
  Module.ccall("othello_compute_move", null,
               ["number", "number", "number", "number"],
               [this.ptr, player, this.outRow, this.outCol]);
  return [Module.getValue(this.outRow, "i32"),
          Module.getValue(this.outCol, "i32")];
};
JavaScript uses a prototype-based object-oriented model inspired by the Self programming language. Objects have a prototype property, which is an object that can have function properties, and potentially its own prototype (for inheritance). When a method is invoked on an object like foo.bar(), the JavaScript interpreter will look for a bar method in foo's prototype (or its prototype, and so on).
To set up an object's prototype, it's common to have a designated function called a constructor (Board in our case). That function is invoked with a special syntax (new Board()) which creates a new object, sets the prototype of that object to the prototype of the constructor, and then invokes the constructor function. That way, any object created with new Board() will have methods init, cellState, and so on, as well as properties ptr, outRow and outCol.
The web worker communicates with the main execution context in a straight-forward way. In response to "new game" or move messages, it updates the board and replies with the new game state:
var BLACKS_MOVE = 0, WHITES_MOVE = 1, GAME_OVER = 2;
var state;
var board;

function postState() {
  var arr = [];
  for (var row = 0; row < 8; row++) {
    arr.push([]);
    for (var col = 0; col < 8; col++) {
      arr[row][col] = board.cellState(row, col);
    }
  }

  postMessage({state: state,
               board: arr,
               blackScore: board.score(PLAYER_BLACK),
               whiteScore: board.score(PLAYER_WHITE)});
}

onmessage = function(e) {
  if (e.data === "new game") {
    board.init();
    state = BLACKS_MOVE;
    postState();
    return;
  }

  if (state != BLACKS_MOVE ||
      !board.isValidMove(PLAYER_BLACK, e.data.row, e.data.col)) {
    postState();
    return;
  }

  board.makeMove(PLAYER_BLACK, e.data.row, e.data.col);

  if (board.hasValidMove(PLAYER_WHITE)) {
    state = WHITES_MOVE;
    do {
      postState();
      var move = board.computeMove(PLAYER_WHITE);
      board.makeMove(PLAYER_WHITE, move[0], move[1]);
    } while (!board.hasValidMove(PLAYER_BLACK) &&
             board.hasValidMove(PLAYER_WHITE));
  }

  if (board.hasValidMove(PLAYER_BLACK)) {
    state = BLACKS_MOVE;
  } else {
    state = GAME_OVER;
  }

  postState();
}
To load the module generated by Emscripten, we first try using WebAssembly, and if the browser doesn't support that we fall back to the asm.js code.
The Emscripten code will set up the Module object, but we prepare it first by setting the postRun property to a function that will get run after the module is loaded, and in the case of WebAssembly, we set the wasmBinary property to the contents of our WebAssembly binary:
function emscriptenLoaded() {
  board = new Board();
  postMessage("loaded");
}

function start() {
  if (self.WebAssembly) {
    try {
      Module = { postRun: [function() { emscriptenLoaded(); }] };
      var xhr = new XMLHttpRequest();
      xhr.open("GET", "wasm_othello.wasm", false);
      xhr.responseType = "arraybuffer";
      xhr.send(null);
      Module.wasmBinary = xhr.response;
      importScripts("wasm_othello.js");
      return;
    } catch (e) {
      console.error(e);
    }
  }

  try {
    Module = { postRun: [function() { emscriptenLoaded(); }] };
    importScripts("othello.asm.js");
  } catch(e) {
    console.error(e);
    postMessage("error");
  }
}

start();
Building
To compile the Othello engine to asm.js and wasm, we use the Emscripten SDK. For asm.js:
$ emcc ../othello.c -O3 -DNDEBUG -o othello.asm.js \
  -s EXPORTED_FUNCTIONS="['_othello_init', \
                          '_othello_cell_state', \
                          '_othello_score', \
                          '_othello_has_valid_move', \
                          '_othello_is_valid_move', \
                          '_othello_make_move', \
                          '_othello_compute_move']" \
  -s EXPORTED_RUNTIME_METHODS="['_malloc','ccall','getValue']" \
  -s NO_FILESYSTEM=1 --memory-init-file 0
(To look at the output, build with -g to turn off minification.)
And for WebAssembly:
$ emcc ../othello.c -O3 -DNDEBUG -o wasm_othello.js \
  -s EXPORTED_FUNCTIONS="['_othello_init', \
                          '_othello_cell_state', \
                          '_othello_score', \
                          '_othello_has_valid_move', \
                          '_othello_is_valid_move', \
                          '_othello_make_move', \
                          '_othello_compute_move']" \
  -s EXPORTED_RUNTIME_METHODS="['_malloc','ccall','getValue']" \
  -s NO_FILESYSTEM=1 --memory-init-file 0 \
  -s WASM=1 -s "BINARYEN_METHOD='native-wasm'"
Many of the flags are not strictly necessary, but they reduce the size of the generated code, for example by explicitly listing the functions that need to be exported.
Try out the game at web_othello.html!
Exercises
- Make the AI stronger, for example: find a better evaluation function through self-play, implement move ordering, transposition tables, look into how good Othello engines work.
- In the user interface of your choice, show the list of moves, highlight legal moves on the board and white's last move(s).
- Add an option to set game difficulty, modifying both the game engine and the user interface.
- On Windows, switch from GDI to GDI+ or DirectDraw to get nicer graphics, in particular anti-aliased drawing of the disks.
If you read all the way here, you're an amazing person! Bugs? Feedback? Please let me know.
"Chess is the intellectual game par excellence. [..] If one could devise a successful chess machine, one would seem to have penetrated to the core of human intellectual endeavour."